NekoBox Configuration Guide (Android)
If you already have a working overseas network environment, follow the "NekoBox Configuration" section. If you do not have one, follow the "Chain Proxy" section first.
IPWeb provides 70 million+ clean residential IPs worldwide across 220+ countries/regions, supporting HTTP, HTTPS, and SOCKS5 for use cases such as data collection, account operations, and ad verification. This guide walks you through registering, purchasing, and configuring proxies in NekoBox (Android).
Need help? Contact us anytime: Telegram t.me/ipwebadmin | Phone 13064703052 | QQ (scan QR code) | WeChat (scan QR code)


Getting Started
1. Create an Account
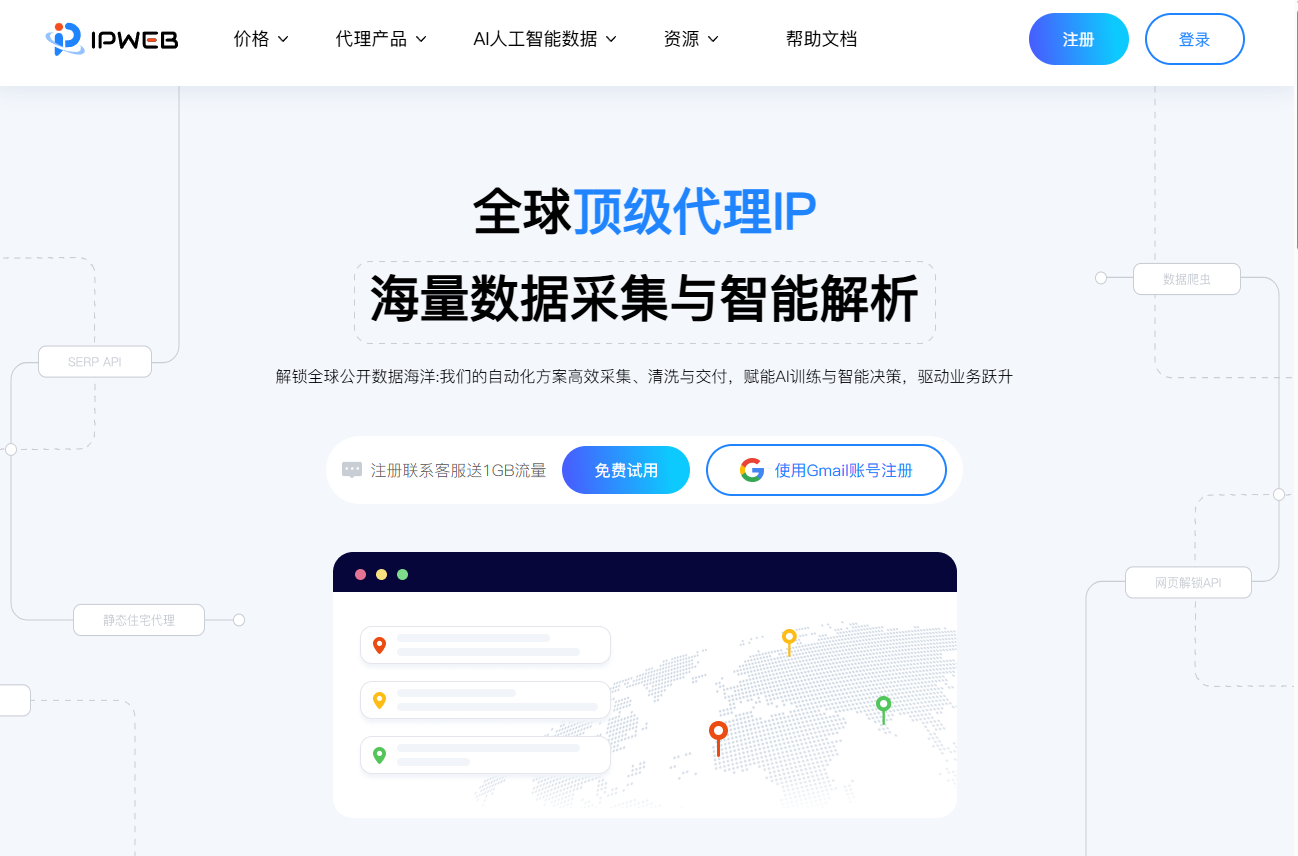
Step 1: Open the IPWeb website at https://ipweb.cc and click Sign Up in the top navigation bar (existing users can click Log In).
Step 2: On the registration page, enter your email address and password; or use Sign up with Gmail (recommended) to skip setting a separate password.
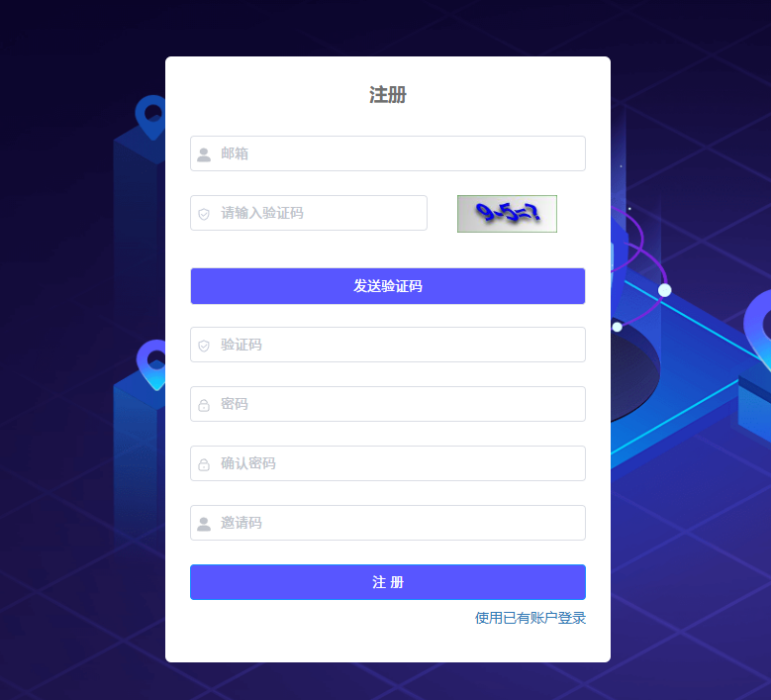
Step 3: Check your inbox for a verification email and click the confirmation link. If you do not see the email, check your spam folder. (Some providers may delay delivery—wait a few minutes.)
2. Claim Trial Traffic
After registration, log in to the IPWeb dashboard at https://user.ipweb.cc for the first time and contact support to receive free trial traffic for all proxy types.
New users can test proxy performance with complimentary traffic before choosing a paid plan.
3. Purchase Static Native Proxies
After logging in to the IPWeb dashboard, go to Proxy Products → Static Native Proxy → Buy Proxy in the left navigation.
On the purchase page, select Dedicated or Shared based on your needs, then choose whether to enable Custom purchase.
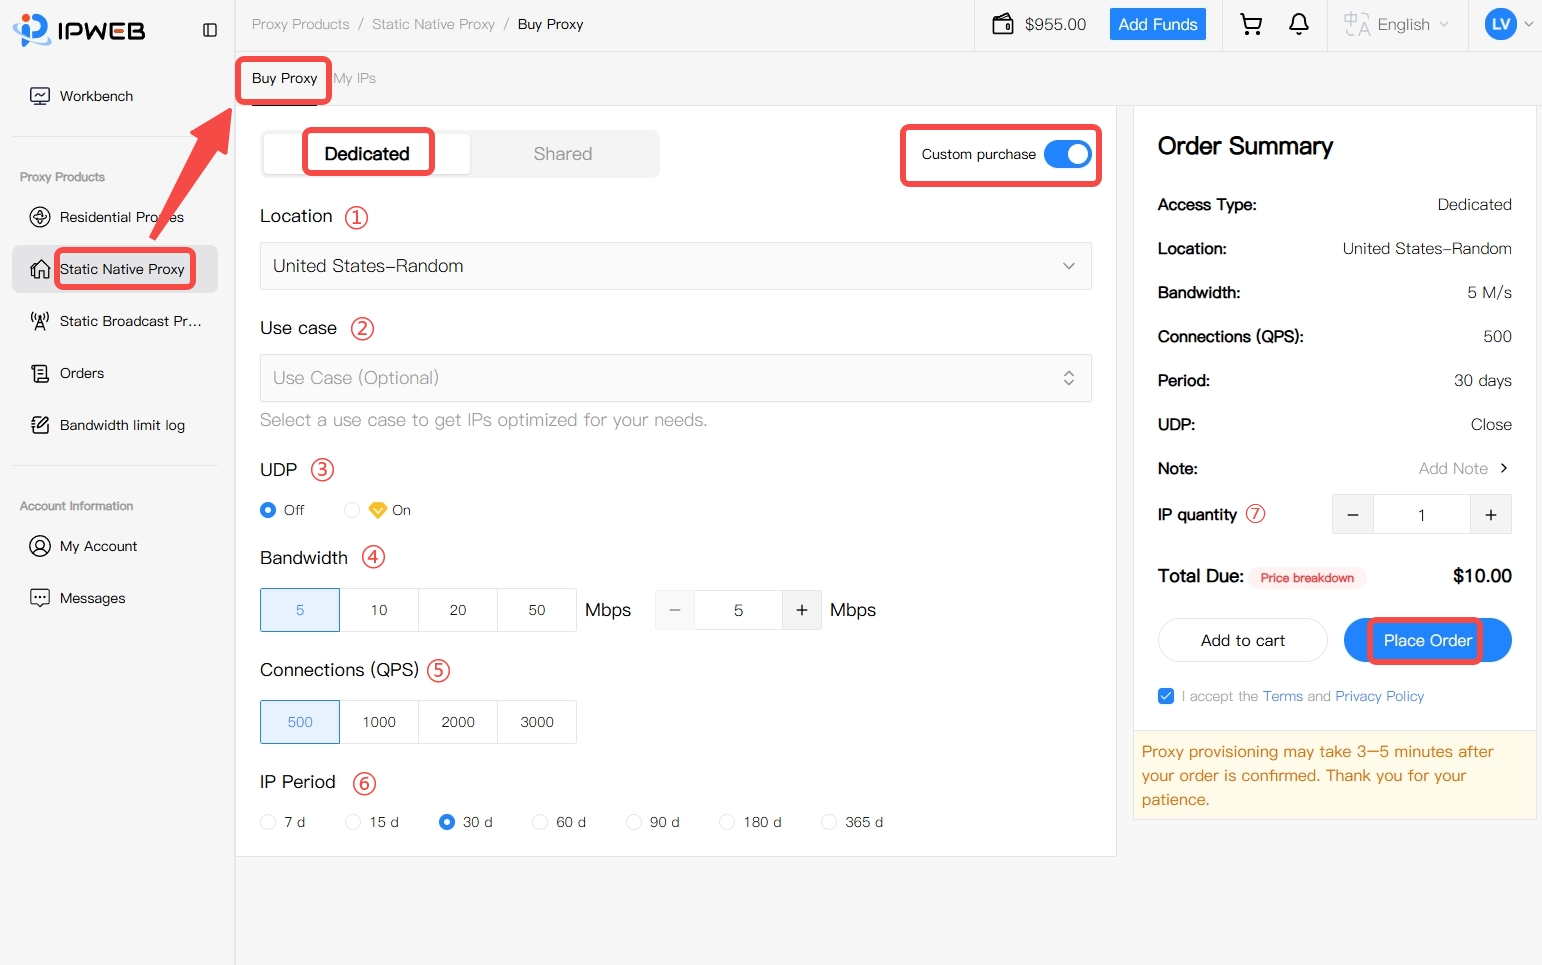
Confirm these parameters when purchasing:
| Parameter | Description |
|---|---|
| Dedicated / Shared | Dedicated proxies are used exclusively by the current account; Shared proxies use a shared resource pool |
| Country / Region | Select the proxy exit location; available options follow current dashboard resources |
| Use case | Optional—select when you have a specific scenario; leave blank if not needed |
| UDP | Enable or disable based on your software, protocol, and business needs |
| Bandwidth | Choose the bandwidth specification for this proxy instance |
| Connections (QPS) | Choose a specification based on concurrent request needs |
| IP period | Select the service duration for the proxy IP |
| IP quantity | Enter how many IPs to purchase |
If you turn off Custom purchase, the page switches to preset package mode, where bandwidth, QPS, UDP, and similar options are predefined by the package.
After confirming country/region, specifications, period, IP quantity, and amount due, click Place Order. After the system creates the order, choose a supported payment method and complete payment. Line provisioning usually takes about 3–5 minutes—wait for the system to finish allocating resources.
For details on Dedicated/Shared, Custom purchase, specifications, and payment, see the IPWeb Static Native Proxy User Guide.
4. View Proxy Connection Details
After your Static Native Proxy has been purchased and activated, go to Proxy Products → Static Native Proxy → My IPs in the left navigation to view purchased proxy resources under the current account.
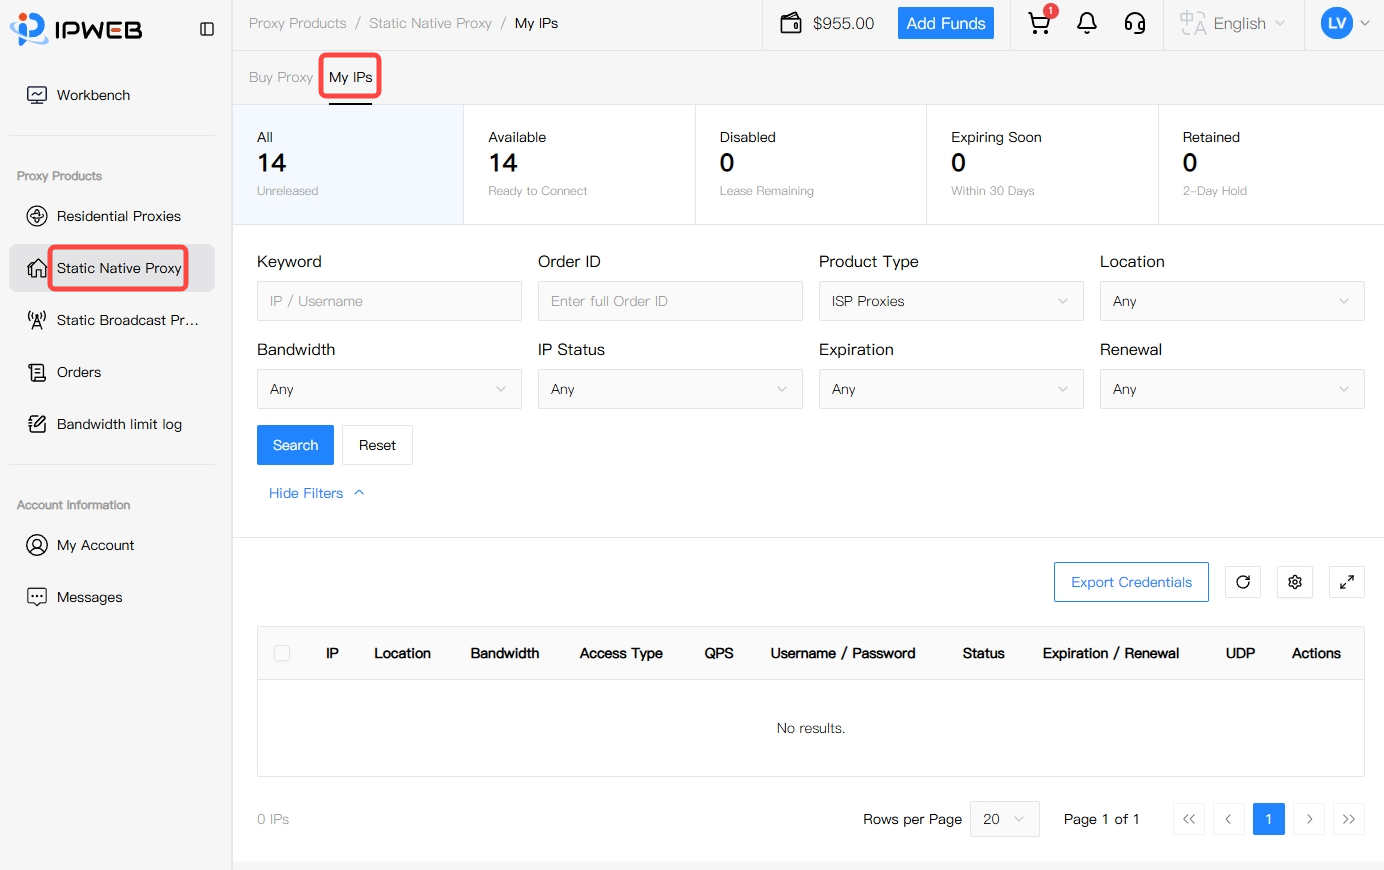
In the proxy list, confirm the details needed for NekoBox configuration:
- IP: The purchased Static Native Proxy address;
- Port: The port used for the proxy connection;
- Username / Password: Credentials used to authenticate the proxy connection;
- Status: Confirm the proxy resource is currently available.
The page also shows country/region, bandwidth, Shared/Dedicated, Connections (QPS), expiration/renewal, UDP, and other fields for verifying the resource. When configuring NekoBox, use the proxy IP, port, username, and password shown here.
For proxy filtering, credential export, renewal, and other management actions, see the IPWeb Static Native Proxy User Guide.
NekoBox Configuration
This section covers the NekoBox client on Android. NekoBox has a clean UI and supports SOCKS5 / HTTP, making it suitable for quick residential proxy setup.
Before configuring, complete the purchase flow above, have your connection details (server, port, username, password), and install NekoBox on Android.
1. Prepare Proxy Connection Details
Confirm you have:
- Proxy server address
- Port number
- Username
- Password
2. Add an IPWeb Proxy Node
Open NekoBox and follow these steps:
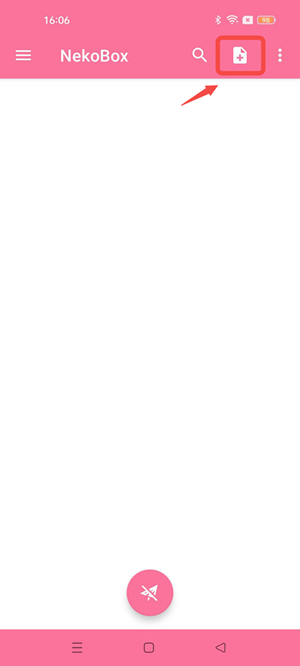
① Tap the add button
On the main screen, tap the file icon with + in the top-right corner to open the node type menu.
② Select the proxy protocol
Choose the protocol that matches what you obtained from IPWeb. Screenshots in this guide use HTTP, so tap HTTP.
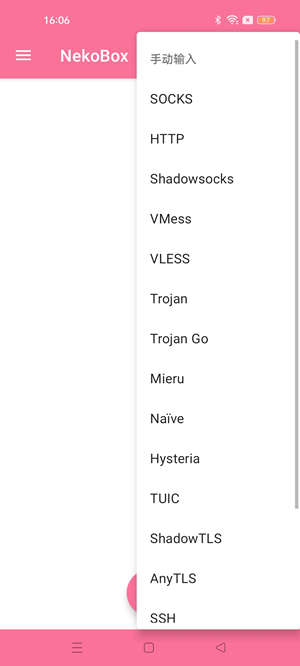
⚠️ The protocol must match IPWeb: choose HTTP for HTTP proxies, or SOCKS for SOCKS5. A mismatch will prevent connection.
③ Fill in server settings
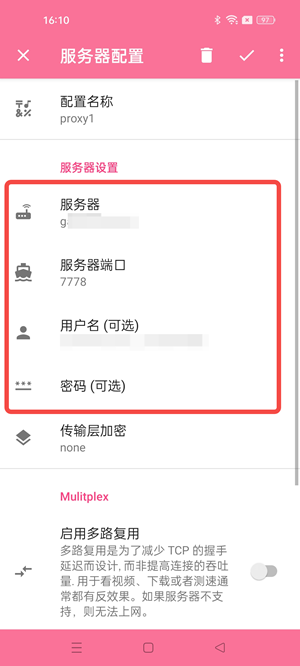
On the Server Configuration page:
| Field | Value |
|---|---|
| Profile name | proxy1 or any recognizable name |
| Server | Your proxy server address |
| Server port | Your port (e.g. 7778) |
| Username (optional) | Your proxy username |
| Password (optional) | Your proxy password |
IPWeb static proxies usually require authentication, so fill in username and password even if the UI marks them optional. Leave other options at defaults; unless required, keep Transport encryption and Multiplexing off.
When finished, tap ✓ in the top-right corner to save.
3. Start the Node and Establish a VPN Connection
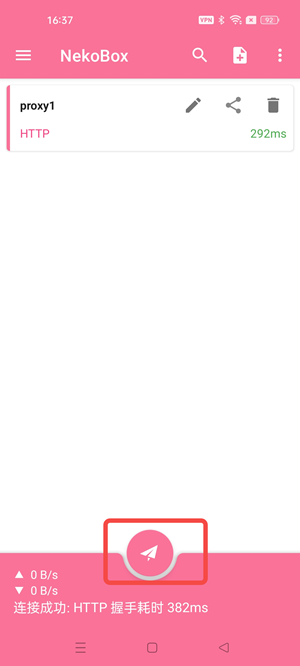
After saving, the node appears on the main screen. Tap it so a pink selection mark appears on the left, then tap the paper airplane button at the bottom center to connect.
On first launch, Android will request VPN permission—tap OK / Allow. When connected:
- A VPN icon appears in the status bar
- Latency shows on the right of the node (e.g.
292ms) - The bottom of the screen shows Connected and handshake time
- The paper airplane indicates connected state
Open a browser and visit https://ipinfo.io or another IP lookup site. Confirm the IP and region match the proxy you purchased. If correct, setup succeeded.
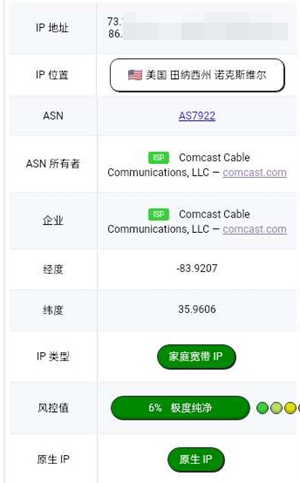
If the check shows your local IP, verify in order:
- NekoBox shows Connected and the status bar has a VPN icon
- The selected node is the IPWeb node you just added
- Server, port, username, and password match IPWeb exactly
- Protocol (SOCKS / HTTP) matches the dashboard
- You allowed the Android VPN permission prompt
4. Add or Switch Multiple Nodes (Optional)
If you have multiple IPWeb proxies, repeat the steps above for each one. Use distinct names such as proxy0 and proxy1.
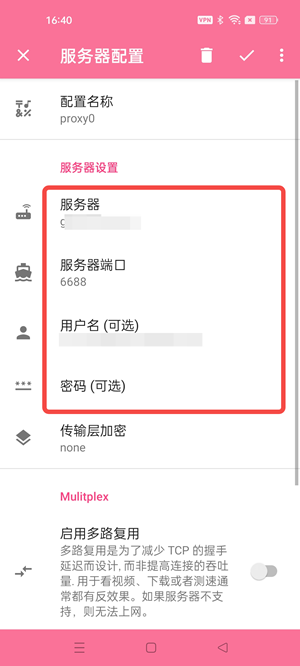
To switch nodes, disconnect first, tap the target node (pink mark on the left), then tap the paper airplane again.
Chain Proxy
If your local network cannot reach the target country/region proxy directly, configure a chain proxy in NekoBox: first connect through a reachable overseas upstream proxy, then to the target downstream proxy.
Path:
Device -> Upstream proxy (overseas) -> Downstream proxy (target country/region) -> Target website
For example, use a Hong Kong proxy as upstream and a US static residential proxy as downstream. The final egress should be the US downstream IP, not your local public IP or the Hong Kong upstream IP.
1. Prepare Two Proxy Nodes
Prepare address, port, username, and password for:
| Role | Purpose | Example name |
|---|---|---|
| Upstream proxy | First hop reachable from your current network | proxy0 |
| Downstream proxy | Final business egress in the target country/region | proxy1 |
Prefer a nearby, low-latency, stable node as upstream; choose downstream by business location needs.
This section uses two HTTP nodes. For SOCKS5, select SOCKS and keep the protocol consistent with your provider.
2. Add Upstream and Downstream Nodes Separately
Using the earlier “Add an IPWeb Proxy Node” steps, create upstream proxy0 and downstream proxy1. Fill each node’s server, port, username, and password, then tap ✓ to save.
Both nodes should appear on the main screen. Optionally start each alone first to verify credentials and protocol.
Upstream is the first hop. If it fails or is too slow, downstream will also fail. Confirm upstream works in your current network first.
3. Create the Chain Proxy
On the main screen, tap the top-right + file icon, scroll the type list, and select Chain Proxy.
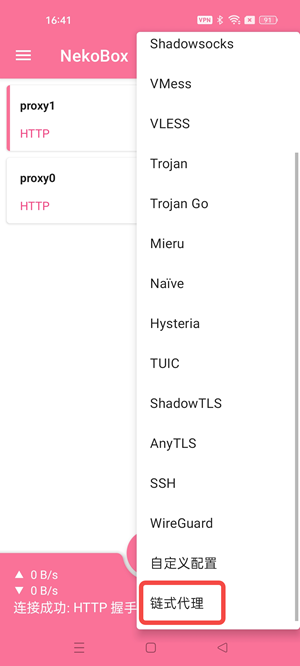
On the Chain Settings page:
- Set Profile name to
chain proxy(or another clear name) - Tap Add server profile
- Add upstream and downstream nodes in order
- Confirm order is
proxy0 → proxy1(upstream above, downstream below) - Tap ✓ to save
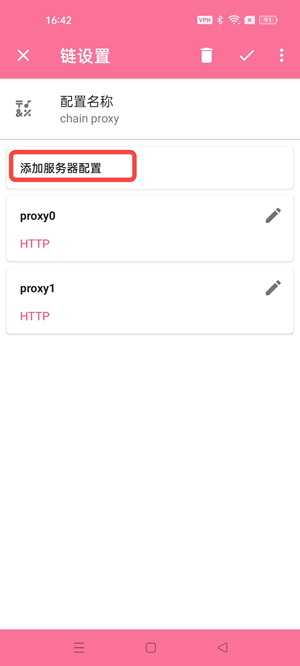
⚠️ Keep order as upstream → downstream, with downstream as final egress.
proxy0/proxy1are only example names—follow your actual node roles to avoid wrong exit IP or connection failure.
4. Start the Chain Proxy
On the main screen, select chain proxy (pink mark on the left), then tap the bottom paper airplane button.
When connected, latency appears next to chain proxy, the bottom shows Connected, and the status bar shows VPN.
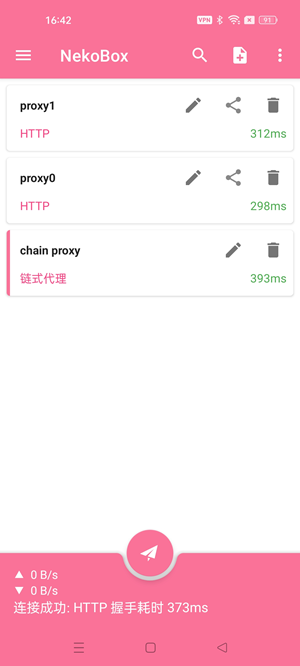
Start the
chain proxyentry itself—not standaloneproxy0orproxy1. NekoBox calls both nodes in the chain order automatically.
5. Verify Final Egress IP
Visit https://ipinfo.io or another trusted IP checker and confirm:
- Displayed IP matches the downstream proxy IP
- Country/region matches your purchased target line
- Result is neither your local public IP nor the upstream egress IP
If the result matches the downstream target IP, chain proxy is working. Extra hop latency is normal.
6. Troubleshooting
| Issue | What to check |
|---|---|
| Chain fails to start | Recheck both nodes’ server/port/protocol/credentials; test upstream alone first |
| Downstream always times out | Confirm upstream is reachable; try a lower-latency overseas upstream |
| Detected IP is upstream | Check whether downstream is missing or order is reversed; must be upstream → downstream |
| Detected IP is still local | Confirm chain proxy is selected and started, VPN permission is granted, and VPN icon is visible |
| Connected but slow | One extra hop adds latency; shorten upstream distance and avoid stacking extra proxies |
Button names, layout, and VPN prompts may vary by NekoBox or Android version. Use proxies only for lawful purposes and follow target site terms and local laws.
If you run into issues not covered above, contact us for technical support:
- Telegram: t.me/ipwebadmin
- Phone: 13064703052
- QQ: (scan QR code to add)
- WeChat: (scan QR code to add)
- Help docs: https://docs.ipweb.cc/
For more client configuration guides (Clash Verge, v2rayN, etc.), visit IPWeb Proxy Configuration Tutorials.