v2rayN Configuration Guide
If you already have a working overseas network environment, follow the "v2rayN Configuration" section. If you do not have one, follow the "Chain Proxy" section first.
IPWeb provides 70 million+ clean residential IPs worldwide across 220+ countries/regions, supporting HTTP, HTTPS, and SOCKS5 protocols for use cases such as data collection, account operations, and ad verification. This guide walks you through the full workflow—from registration and purchase to configuring proxies in the v2rayN client.
Need help? Contact us anytime: Telegram t.me/ipwebadmin | Phone 13064703052 | QQ (scan QR code) | WeChat (scan QR code)


Getting Started
1. Create an Account
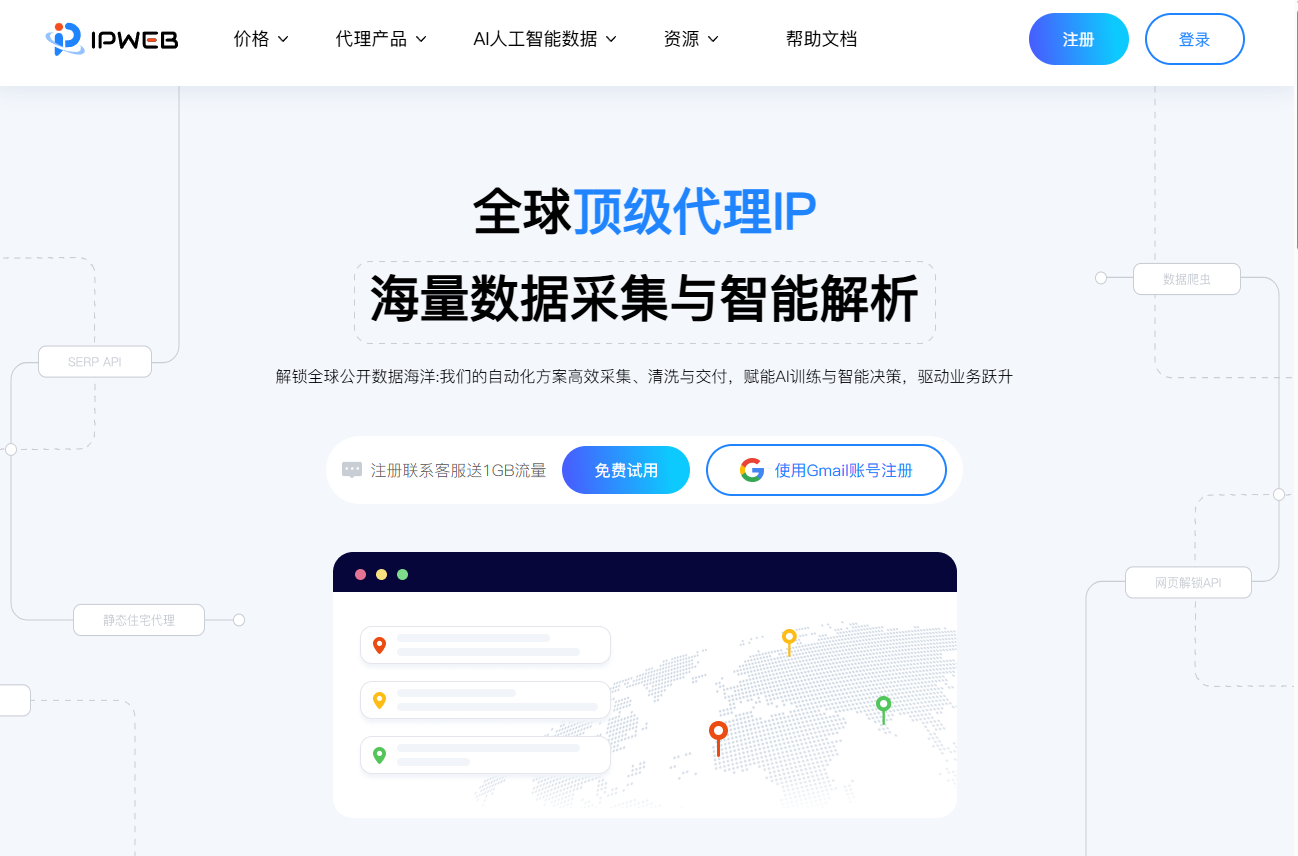
Step 1: Open the IPWeb website at https://ipweb.cc and click the 注册 (Register) button in the top navigation bar (if you already have an account, click 登录 (Log In) instead).
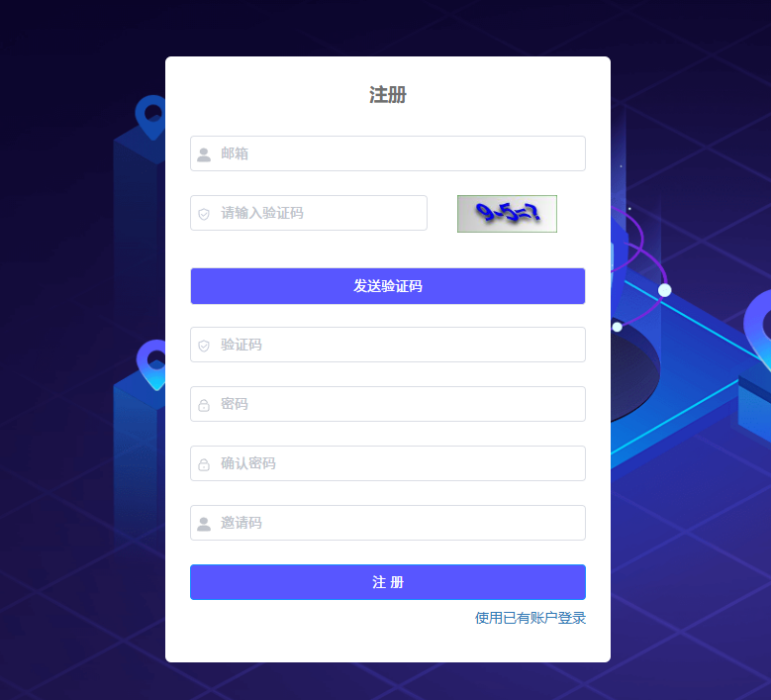
Step 2: On the registration page, enter your email address and login password; or use Sign in with Gmail for quick registration (recommended) to skip setting a separate password.
Step 3: Check your inbox for a verification email and click the confirmation link to verify your email. If you do not see the email, check your spam folder. (Some mail providers may delay delivery—wait a few minutes.)
2. Claim Trial Traffic
After registration, log in to the IPWeb user dashboard at https://user.ipweb.cc for the first time and contact customer support to receive free trial traffic to try all proxy types.
New users can test proxy performance with the complimentary traffic before choosing a paid plan.
3. Purchase Static Native Proxies
After logging in to the IPWeb dashboard, go to Proxy Products → Static Native Proxy → Buy Proxy in the left navigation.
On the purchase page, select Dedicated or Shared based on your needs, then choose whether to enable Custom purchase.
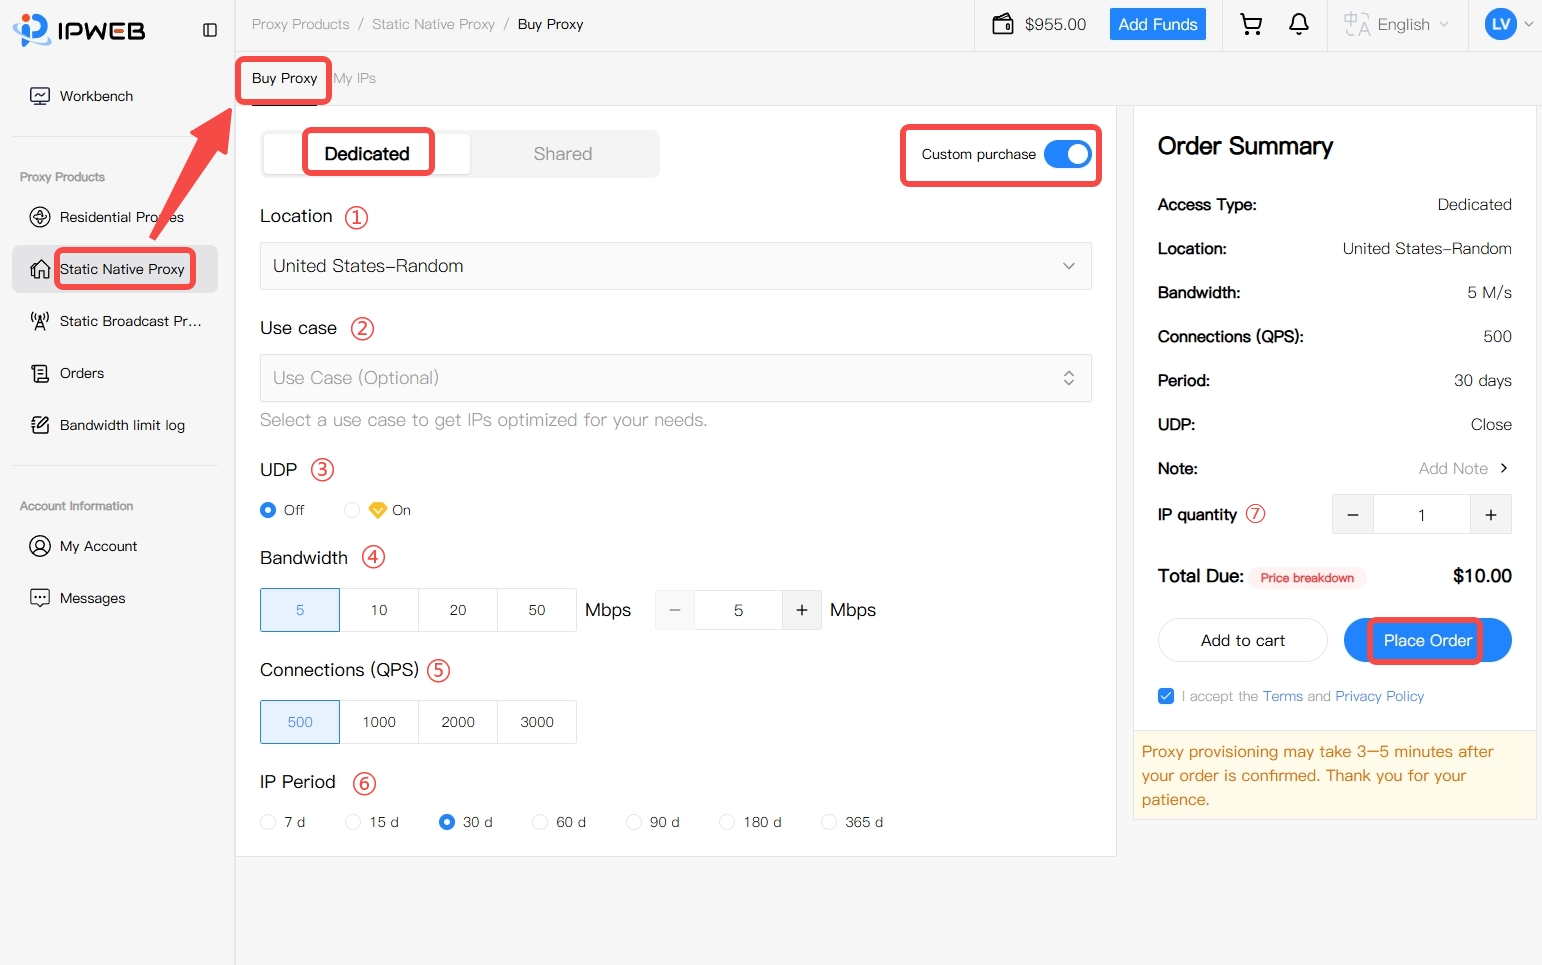
Confirm these parameters when purchasing:
| Parameter | Description |
|---|---|
| Dedicated / Shared | Dedicated proxies are used exclusively by the current account; Shared proxies use a shared resource pool |
| Country / Region | Select the proxy exit location; available options follow current dashboard resources |
| Use case | Optional—select when you have a specific scenario; leave blank if not needed |
| UDP | Enable or disable based on your software, protocol, and business needs |
| Bandwidth | Choose the bandwidth specification for this proxy instance |
| Connections (QPS) | Choose a specification based on concurrent request needs |
| IP period | Select the service duration for the proxy IP |
| IP quantity | Enter how many IPs to purchase |
If you turn off Custom purchase, the page switches to preset package mode, where bandwidth, QPS, UDP, and similar options are predefined by the package.
After confirming country/region, specifications, period, IP quantity, and amount due, click Place Order. After the system creates the order, choose a supported payment method and complete payment. Line provisioning usually takes about 3–5 minutes—wait for the system to finish allocating resources.
For details on Dedicated/Shared, Custom purchase, specifications, and payment, see the IPWeb Static Native Proxy User Guide.
4. View Proxy Connection Details
After your Static Native Proxy has been purchased and activated, go to Proxy Products → Static Native Proxy → My IPs in the left navigation to view purchased proxy resources under the current account.
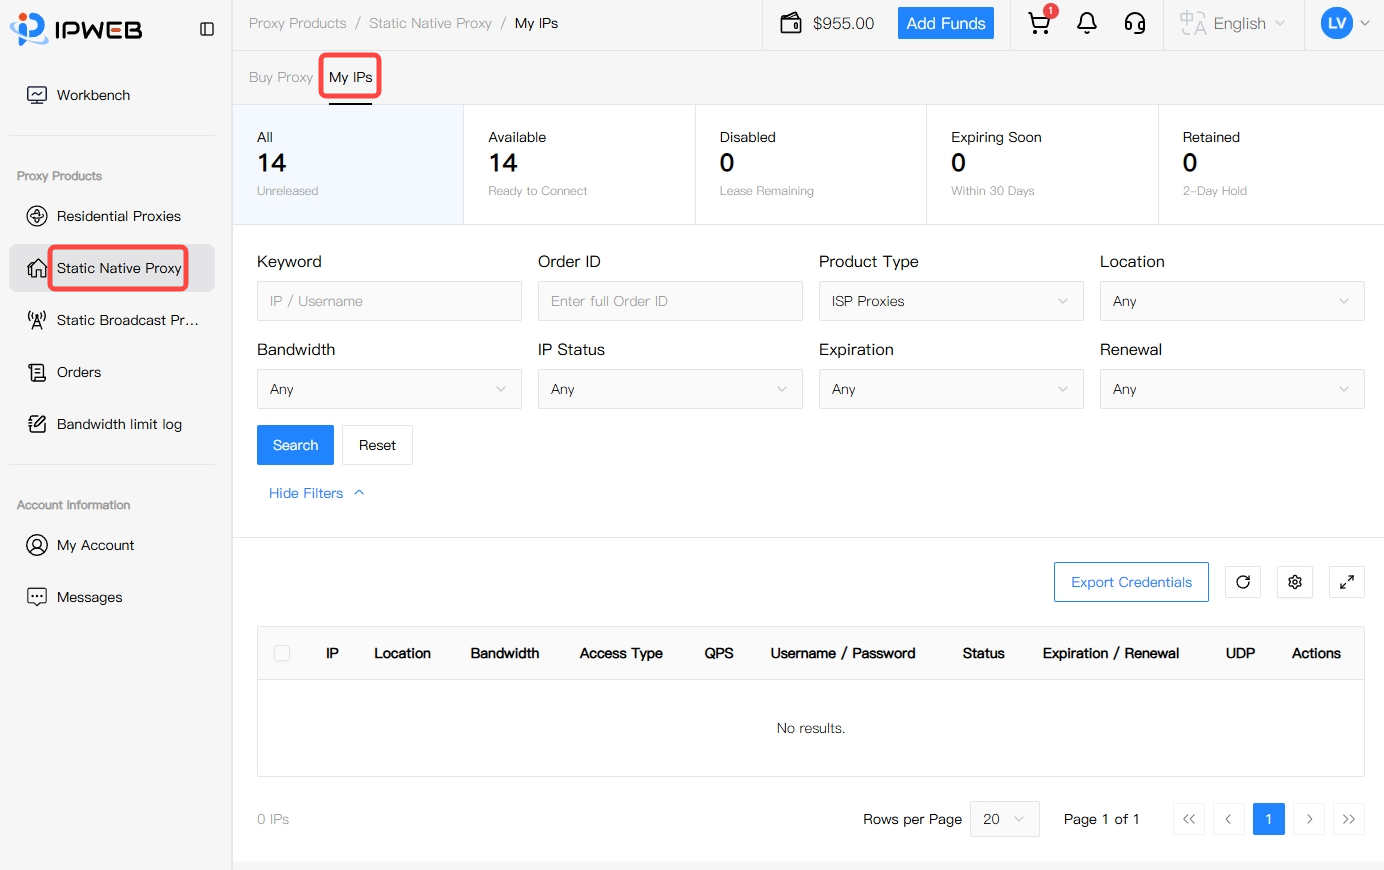
In the proxy list, confirm the details needed for v2rayN configuration:
- IP: The purchased Static Native Proxy address;
- Port: The port used for the proxy connection;
- Username / Password: Credentials used to authenticate the proxy connection;
- Status: Confirm the proxy resource is currently available.
The page also shows country/region, bandwidth, Shared/Dedicated, Connections (QPS), expiration/renewal, UDP, and other fields for verifying the resource. When configuring v2rayN, use the proxy IP, port, username, and password shown here.
For proxy filtering, credential export, renewal, and other management actions, see the IPWeb Static Native Proxy User Guide.
Configure IPWeb Proxies in v2rayN
This guide is written for the v2rayN client. v2rayN is a Windows proxy tool built on the V2Ray core, supporting SOCKS5, HTTP, and other proxy protocols. The steps below apply to v2rayN 7.x (earlier 6.x versions follow a similar workflow).
Before configuring, complete the purchase workflow in the previous section and have your proxy connection details ready (proxy server address, port, username, and password).
1. Prepare Proxy Connection Details
Confirm you have the following four items:
- Proxy server address
- Port number
- Username
- Password
If you purchased dynamic residential proxies, these details are in the txt file you generated and downloaded; for static residential proxies, view them under 已购线路明细 (Purchased Line Details).
Each line in the txt file follows the format
server_address:port:username:passwordand can be used directly in order.
2. Add an HTTP / SOCKS5 Proxy Server
Open the v2rayN client and follow these steps:
① Create a new server from the Settings menu
- Click 配置项 (Settings) in the top menu bar.
- In the dropdown menu, click 添加 [HTTP] (Add [HTTP]) (if your proxy protocol is SOCKS5, choose 添加 [SOCKS] (Add [SOCKS]) instead). The fields are the same for both—only the protocol type differs.
![v2rayN Settings menu — select Add [HTTP]](https://oss.ipweb.cc/docs/imgs/2026/07/v2rayn-step1.png)
② Fill in the proxy connection parameters
In the dialog that appears, complete the following fields:
| Parameter | Value | Description |
|---|---|---|
| 别名 (remarks) | proxy1 or any recognizable name | Used to distinguish servers in the node list |
| 地址 (address) | Your proxy server address | From the information obtained in Section 3 (e.g., gate1.ipweb.cc) |
| 端口 (port) | Your port number | From the information obtained in Section 3 (e.g., 7778) |
| 用户名 (optional) | Your username | IPWeb proxy authentication account |
| 密码 (optional) | Your password | IPWeb proxy authentication password |
Leave all other fields (transport layer, transport protocol, etc.) at their defaults—no changes needed.
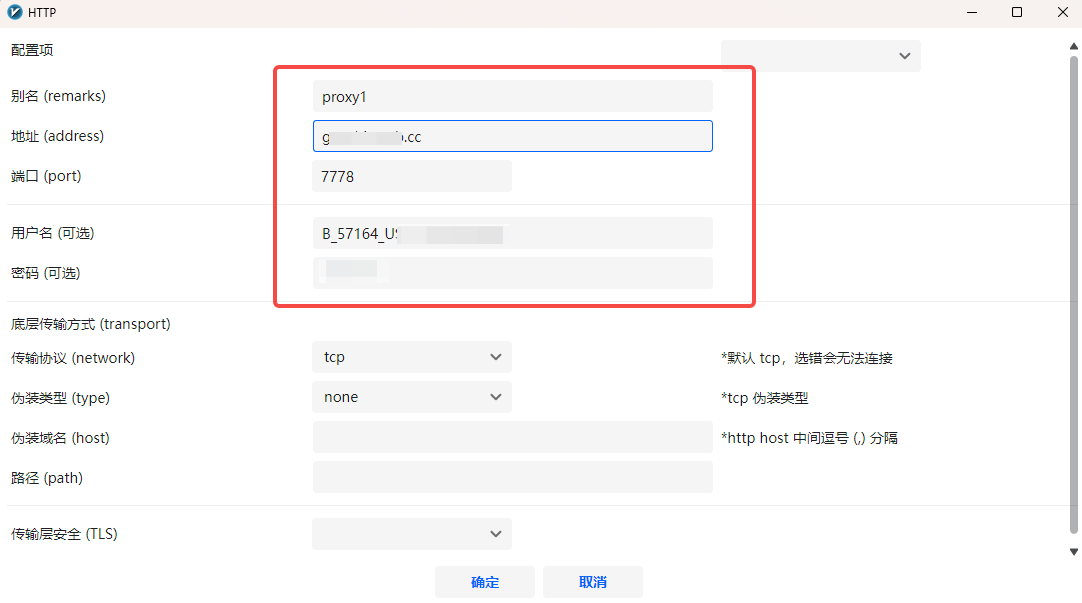
③ Save the server
After confirming the five key fields above are correct, click 确定 (OK). The newly added server will appear immediately in the server list on the v2rayN main window.
3. Set as Active Node and Test Latency
① Right-click the node to set it as active
In the server list, find the node you just added (e.g., proxy1), right-click it, and select 设为活动 (Set as Active) from the context menu (or double-click the node). Once activated, a red 活动 (Active) label appears next to the node name to indicate the current selection.
You can also select 测试延迟 TcPing(多选) (Test Delay TcPing — Multi-select) from the same context menu to quickly check connectivity.
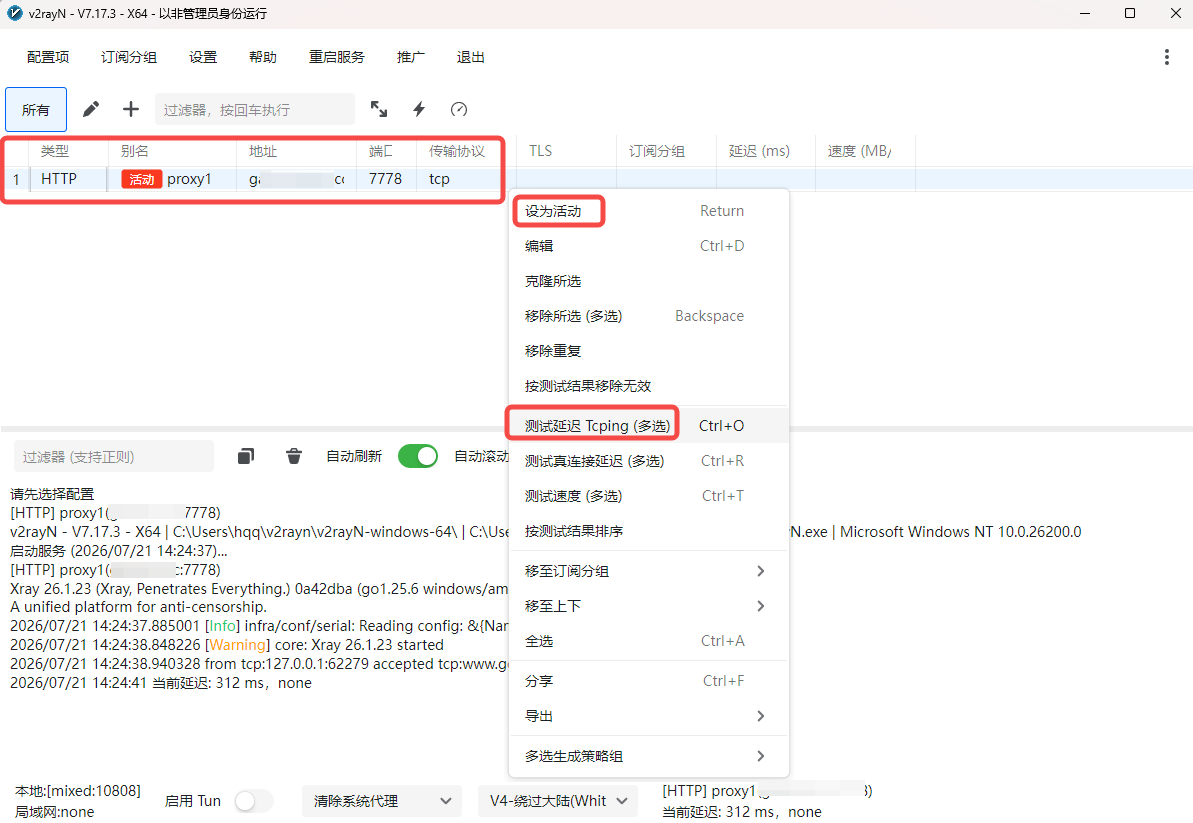
If you need to manage multiple IPWeb proxy accounts, repeat Step 2 to add each one, then switch between nodes as needed.
② Review the test results
After the latency test completes, the 延迟 (ms) (Delay (ms)) column on the right side of the server list shows the measured value (e.g., 353). As long as a value appears (typically in the hundreds of milliseconds), the proxy connection is working.
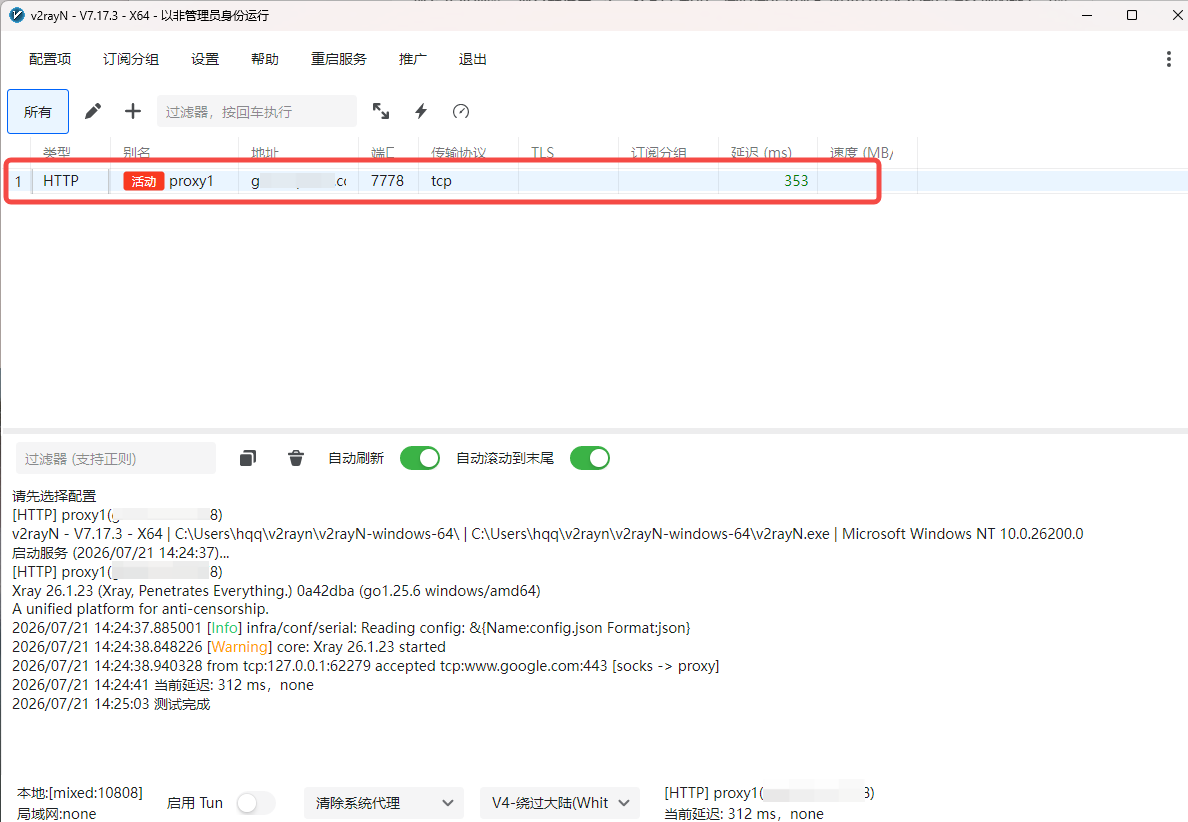
4. Enable Tun Mode and Verify Exit IP
① Enable Tun mode
In the bottom area of the v2rayN main window, find the 启用 Tun (Enable Tun) toggle and turn it on (the toggle turns green when enabled). Tun mode routes all system network traffic so every request goes through your selected proxy IP.
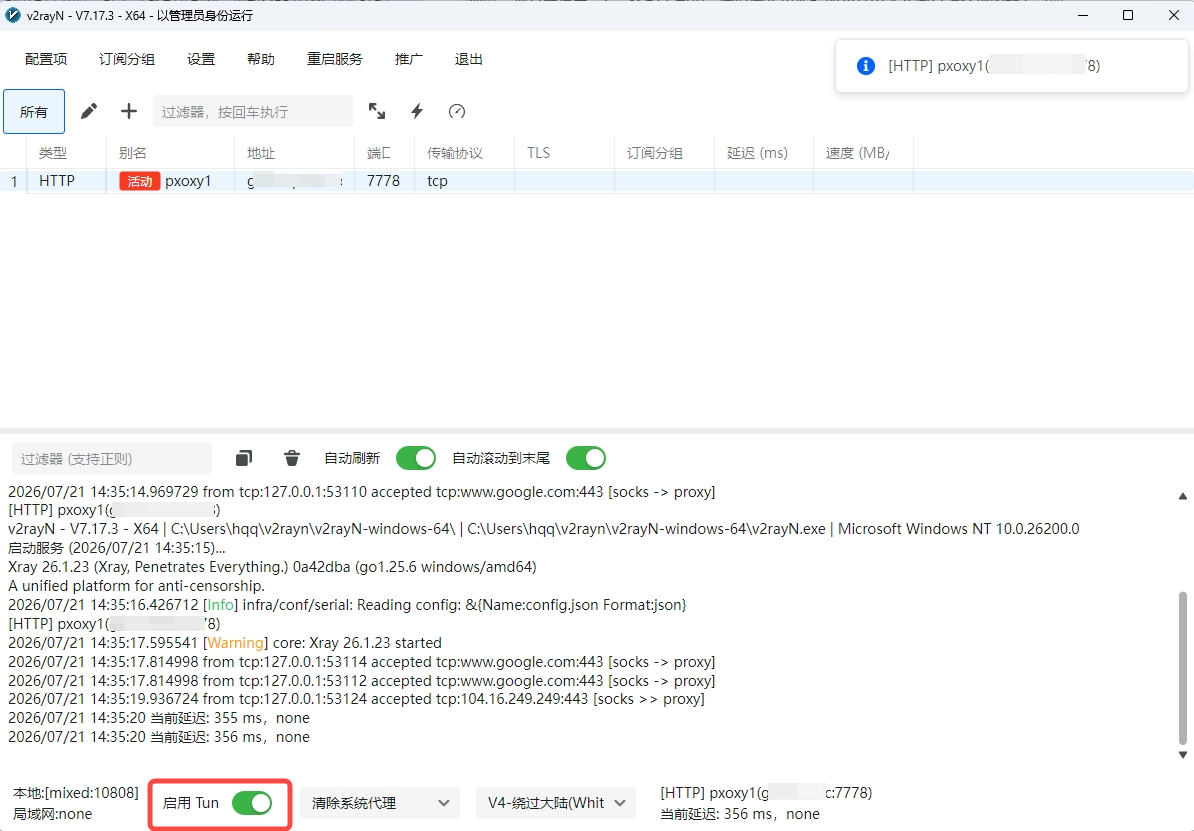
If you only need the browser to use the proxy while other apps connect directly, use the dropdown next to 清除系统代理 (Clear System Proxy) at the bottom to switch to PAC or proxy-only mode. For data collection, account operations, and similar use cases, Tun mode is recommended to ensure a consistent exit IP for all traffic.
② Verify the proxy is working
After completing all steps above, verify using the following method:
Method 1: Visit an IP lookup site in your browser
Open a browser and visit https://ipinfo.io or another IP lookup site. Check whether the returned IP address and location match the proxy region you purchased.
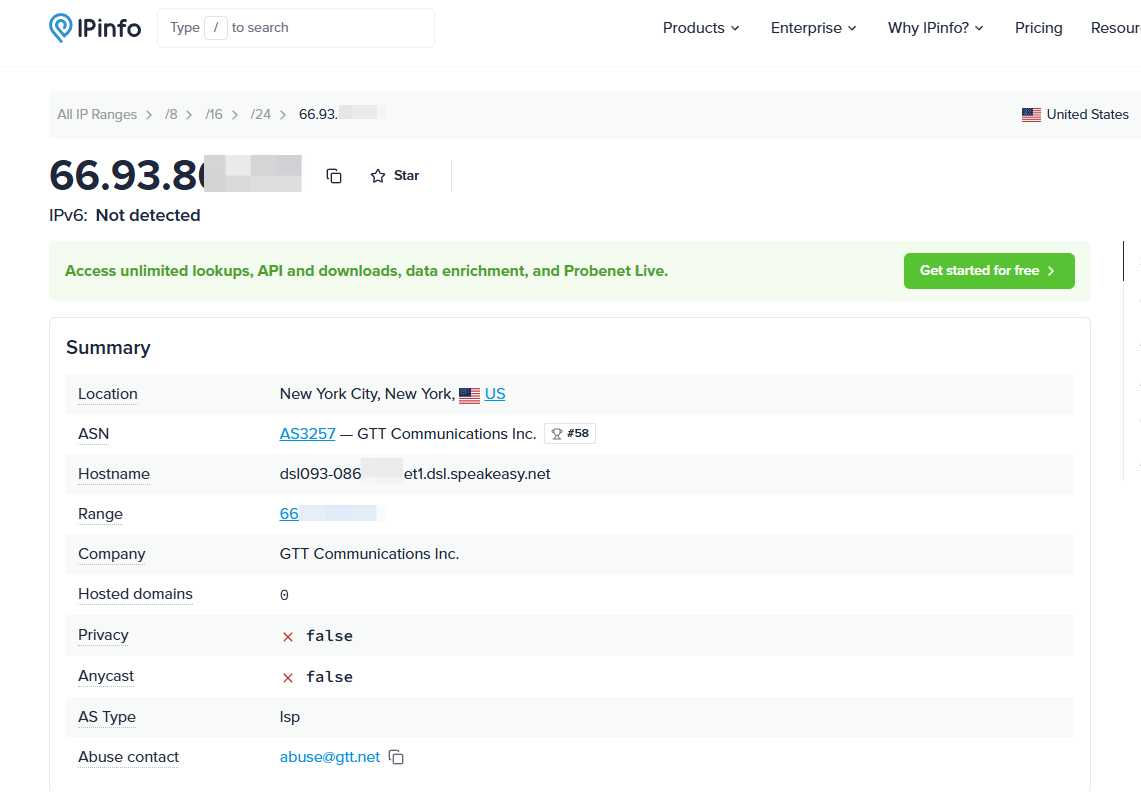
If the result is correct (the IP location matches the country/region you purchased), v2rayN is configured successfully ✅.
If the IP check shows your local IP, troubleshoot in this order:
- Confirm the active server is the correct IPWeb node (the one with the red 活动 (Active) label in the list)
- Confirm the 启用 Tun (Enable Tun) toggle is on (green)
- Confirm the address, port, username, and password match the dashboard exactly (watch for extra spaces)
- Right-click the node and run 测试延迟 TcPing (Test Delay TcPing) again to confirm connectivity
Chain Proxy
If your local network cannot connect directly to the downstream proxy in your target country, configure a chain in v2rayN: connect to a reachable overseas upstream proxy first, then route to the downstream proxy.
Path:
Local machine -> Upstream proxy -> Downstream proxy -> Target website
For example, use a Hong Kong node as upstream and a US node as downstream. The final detected IP should be the downstream node's IP.
1. Prepare Two Proxy Nodes
Prepare address, port, username, and password for:
| Role | Purpose | Example Alias |
|---|---|---|
| Upstream proxy | First-hop forwarding to overseas network | proxy1-HK |
| Downstream proxy | Final business egress in target country | proxy2-US |
2. Create Upstream Group
In v2rayN:
- Click Subscription Group
- Click Add
- Set alias to
pre(or another recognizable name) - Keep other options default and save (no subscription URL needed)
3. Add Upstream Proxy to pre
- Select
pregroup - Click Settings -> Add [HTTP] (or Add [SOCKS] if needed)
- Fill alias/address/port/username/password for upstream, e.g.
proxy1-HK - Save and run latency test
Make sure the upstream proxy itself is reachable before continuing.
4. Create Downstream Group and Bind Upstream
Create another group for downstream proxies:
- Open Subscription Group -> Add
- Set alias to
land - In Upstream Proxy Config Alias, select
proxy1-HK - Save the group
Select the upstream-proxy alias field correctly. In this setup,
proxy1-HKis upstream andproxy2-USis downstream/final egress.
5. Add Downstream Proxy to land
- Select
landgroup - Click Settings -> Add [HTTP] (or SOCKS as needed)
- Fill downstream alias/address/port/username/password, e.g.
proxy2-US - Save
Because land is bound to the upstream proxy, downstream connections in this group will route through proxy1-HK.
6. Activate Downstream and Enable Tun
In land, set downstream proxy (proxy2-US) as active, then enable Tun at the bottom.
Traffic path becomes:
Local machine ->
proxy1-HK->proxy2-US-> Target website
7. Verify Final Egress IP
Open https://ipinfo.io and confirm:
- Displayed IP equals downstream (
proxy2-US) IP - Country/region matches purchased target
- Not local public IP and not upstream egress IP
If all three are true, chain proxy is configured successfully.
8. Troubleshooting
Downstream cannot connect / always times out
- Test upstream node separately in
pre - Verify
landgroup is bound toproxy1-HK - Recheck downstream address/port/username/password
- Restart v2rayN service and test again
Detected IP is upstream region
You may have activated upstream node instead of downstream. Switch to land, set downstream as active, then re-enable Tun.
Detected IP is local public IP
Ensure Enable Tun is green, and run v2rayN as administrator if needed. Also check for conflicts from other proxy tools/browser proxy settings.
Chain works but speed is slow
One extra hop increases latency. Use a closer, more stable upstream node and avoid stacking unnecessary proxy software.
If you run into issues not covered above, contact us for technical support:
- Telegram: t.me/ipwebadmin
- Phone: 13064703052
- QQ: (scan QR code to add)
- WeChat: (scan QR code to add)
- Help docs: https://docs.ipweb.cc/
For more client configuration guides (NekoBox, Clash, etc.), visit the IPWeb Proxy Configuration Tutorials.