VMLogin + IPWeb Static Native Proxy Setup Guide
Before using IPWeb proxy services, make sure your local network can reliably access international websites and services. If you encounter connection issues, check your local network connection or contact customer support for assistance.
IPWeb provides 70M+ clean residential IPs across 220+ countries and regions, with support for HTTP, HTTPS, and SOCKS5 protocols. It can support a wide range of use cases, including data collection, account management, and ad verification.
Among them, Static Native Proxies provide stable, fixed outbound IP addresses, making them better suited for use cases that require consistent network environments and reliable connections. This guide covers the complete process, from registration, free trial, and purchasing a Static Native Proxy to configuring and verifying an IPWeb proxy in the VMLogin fingerprint browser.
Contact us anytime if you need help:
- Telegram: t.me/ipwebadmin
- Phone:
13064703052- QQ: Scan the QR code to add us
- WeChat: Scan the QR code to add us


Basic Setup
1. Create an Account
Open the IPWeb website at https://ipweb.cc, then click sign up in the top navigation bar. If you already have an account, click sign in instead.
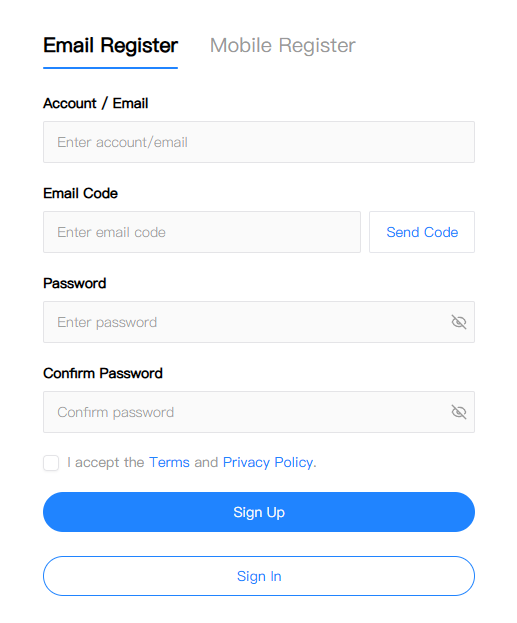
On the registration page, Email Register is available by default. Enter your account name/email address, email verification code, password, and password confirmation. Click Send Code, then check your email for the verification code. After completing the required fields, agree to the Terms of Service and Privacy Policy, then click Sign Up to complete registration. You can also switch to Mobile Register and follow the on-screen instructions to register with your mobile number.
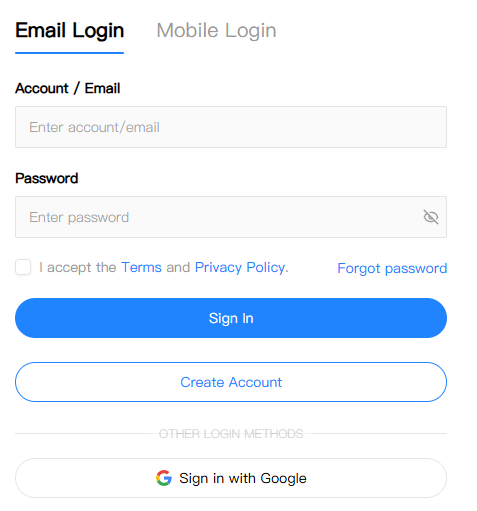
If you already have an account, go directly to the sign-in page and log in with your account name/email address and password. You can also switch to phone number login.
The sign-in page also provides a Sign in with Google option, allowing you to quickly register or log in with your Google account without entering separate email registration details.
2. Claim Free Trial Traffic
After registration, log in to the IPWeb User Dashboard for the first time and contact customer support to receive free trial traffic for testing all proxy types.
New users can use the trial traffic to test proxy performance first, then choose a paid plan after confirming that it meets their needs.
3. Purchase a Static Native Proxy
After logging in to the IPWeb User Dashboard, go to Proxy Products → Static Native Proxy → Buy Proxy from the left-hand navigation menu.
On the purchase page, choose Dedicated or Shared based on your requirements, and decide whether to enable Custom purchase.
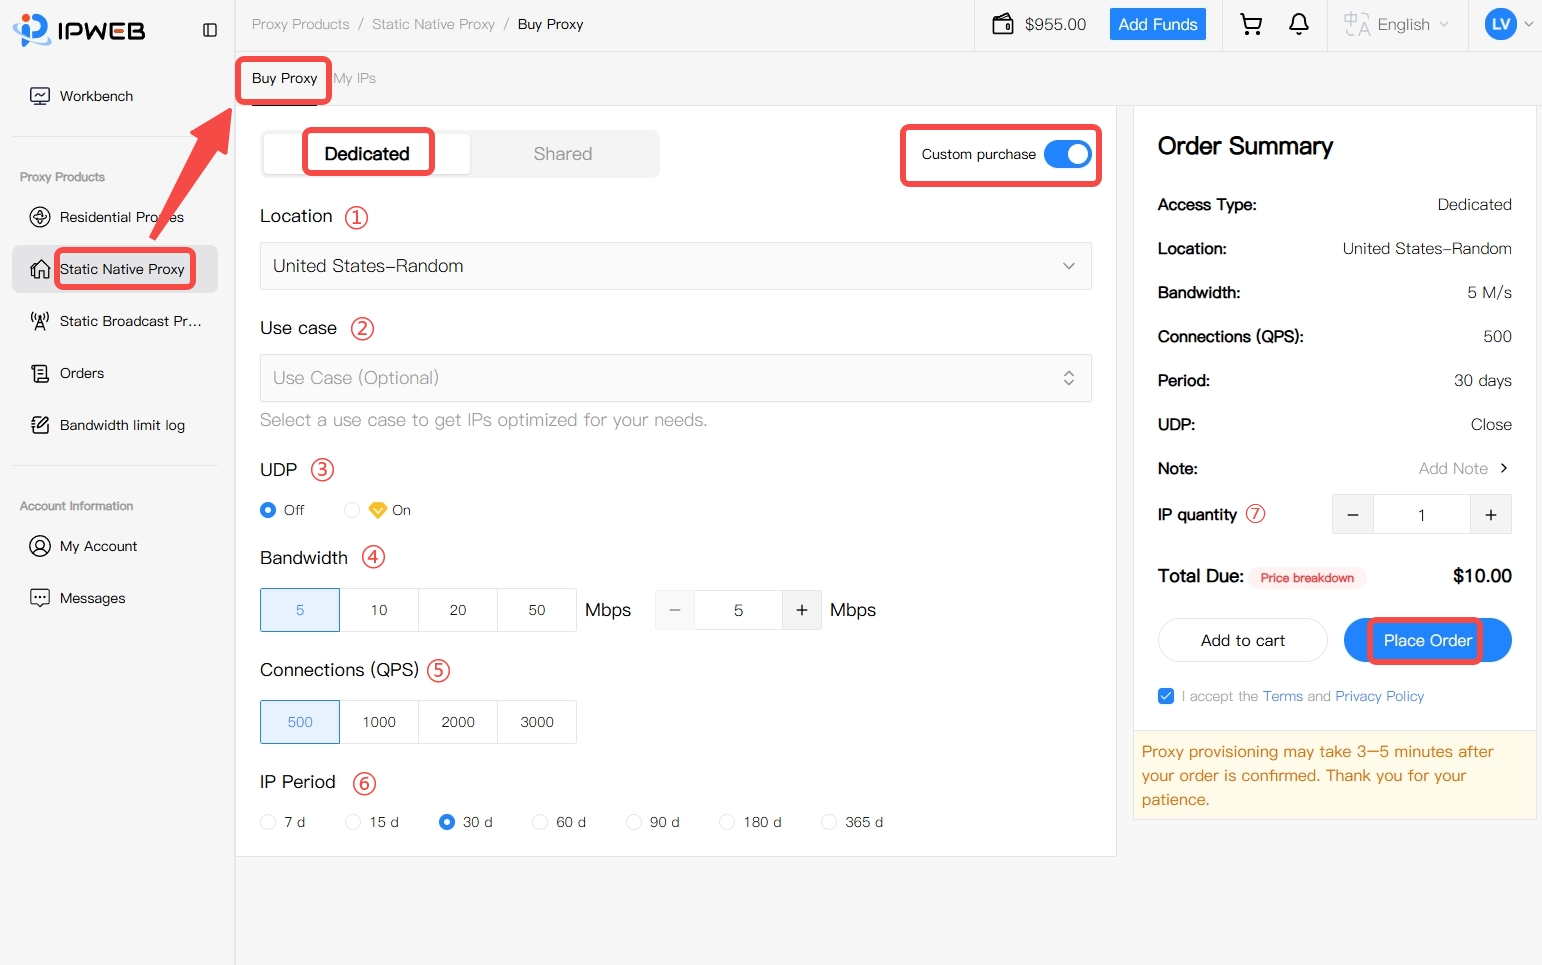
When purchasing, make sure to review the following parameters:
| Parameter | Description |
|---|---|
| Dedicated / Shared | Dedicated proxies are used exclusively by the current account, while shared proxies use a shared resource pool |
| Country / Region | Select the desired proxy exit location. Available locations depend on the resources currently shown in the dashboard |
| Use Case | Select a use case if you have a specific business scenario; otherwise, you can leave it unselected |
| UDP | Enable or disable UDP based on the software, protocol, and business requirements you use |
| Bandwidth | Select the bandwidth specification required for the current proxy instance |
| Connections (QPS) | Select the appropriate specification based on your actual concurrent request requirements |
| IP Subscription Period | Select the service period for the proxy IP |
| Number of IPs | Enter the number of IPs you want to purchase |
If Custom purchase is disabled, the page switches to preset package mode, where bandwidth, QPS, UDP, and other parameters are determined by the selected package.
After confirming that the country/region, specifications, subscription period, number of IPs, and total amount are correct, click Place Order. Once the order is generated, select one of the supported payment methods and complete the payment. After the order is confirmed, line provisioning usually takes about 3–5 minutes. Please wait for the system to complete resource provisioning.
For detailed information about Dedicated/Shared proxies, Custom Purchase, specification options, and the payment process, see the IPWeb Static Native Proxy User Guide.
4. View Proxy Connection Details
After your Static Native Proxy has been purchased and activated, go to Proxy Products → Static Native Proxy → My IPs from the left-hand navigation menu to view the proxy resources purchased under the current account.
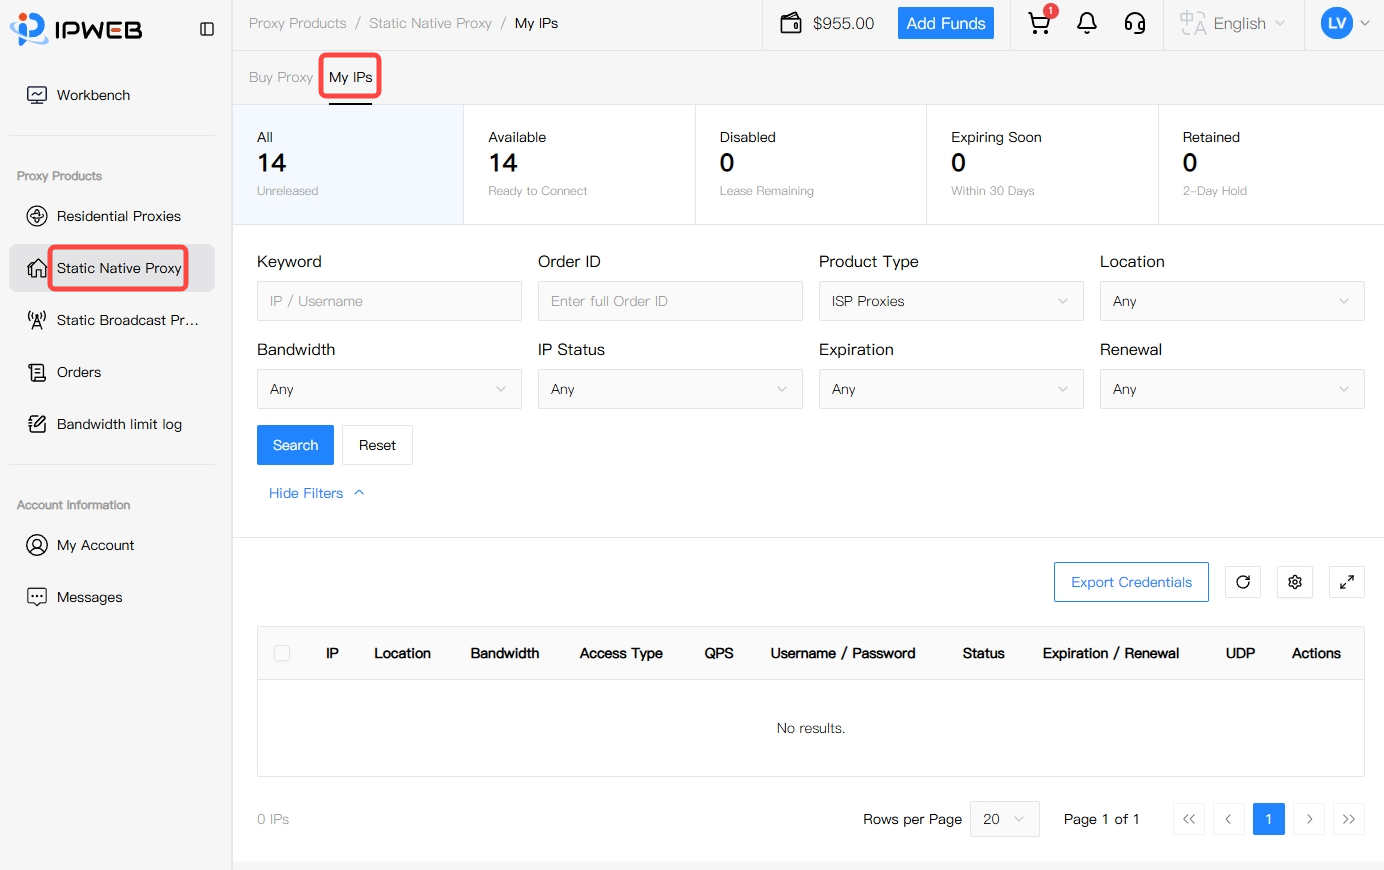
In the proxy list, pay particular attention to the following details, which will be used later when configuring VMLogin:
- IP: The purchased Static Native Proxy address;
- Port: The port used to connect to the proxy;
- Username / Password: The authentication credentials used to connect to the proxy;
- Status: Make sure the current proxy resource is available.
The page also displays information such as country/region, bandwidth, Shared/Dedicated status, connections (QPS), expiration/renewal, and UDP. These details can be used to verify the current proxy resource. When configuring VMLogin later, you will mainly use the proxy IP, port, username, and password shown here.
For information about proxy filtering, account export, renewals, and other management operations, see the IPWeb Static Native Proxy User Guide.
Configure IPWeb Proxy in VMLogin
After completing the steps above and obtaining the IPWeb proxy IP address, port, username, and password, you can configure the proxy in VMLogin.
1. Create a New Browser Profile
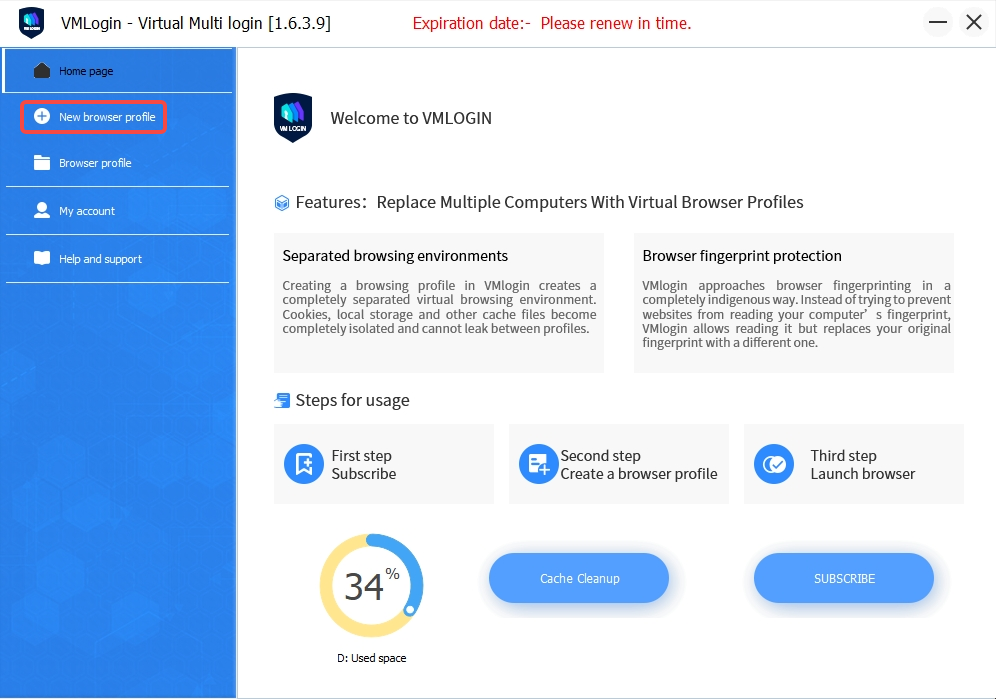
Open VMLogin and click New browser profile on the left.
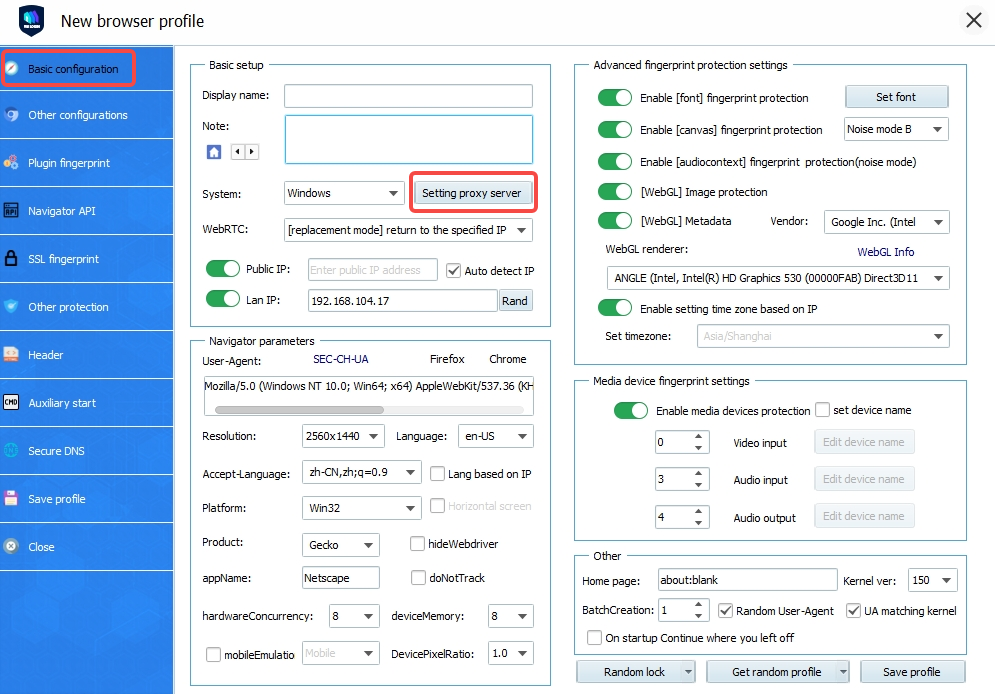
On the profile configuration page, under Basic configuration, click Setting proxy server to open the proxy settings window.
2. Configure the IPWeb Proxy
First, enable Enable proxy server, then enter the proxy information provided by IPWeb:
-
Proxy type: Select the protocol that matches the IPWeb proxy, such as
HTTP ProxyorSOCKS5 Proxy. -
IP address: Enter the IPWeb proxy host.
-
Port: Enter the corresponding proxy port.
-
Username: Enter the proxy username.
-
Password: Enter the proxy password.
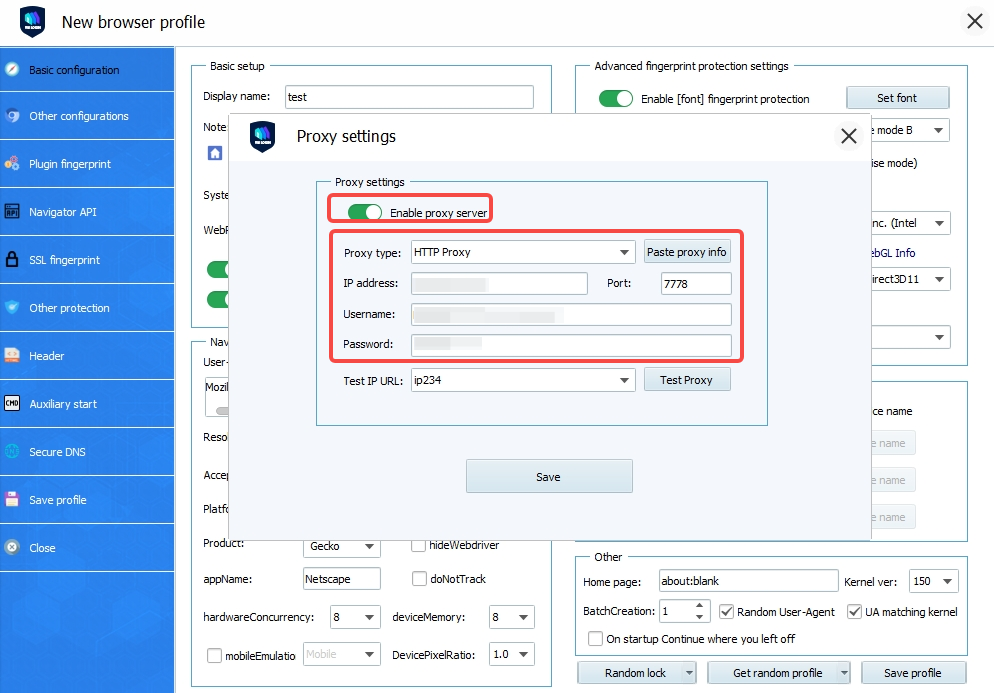
If you have already copied the complete proxy information, you can also click Paste proxy info, then verify that each field has been parsed correctly.
The proxy protocol selected in VMLogin must match the protocol used when obtaining the proxy from IPWeb.
3. Test the Proxy Connection
After entering the proxy information, select a test site under Test IP URL, then click Test Proxy.
If the test succeeds, VMLogin will display the current proxy exit IP together with details such as country, city, region, time zone, and other location information.
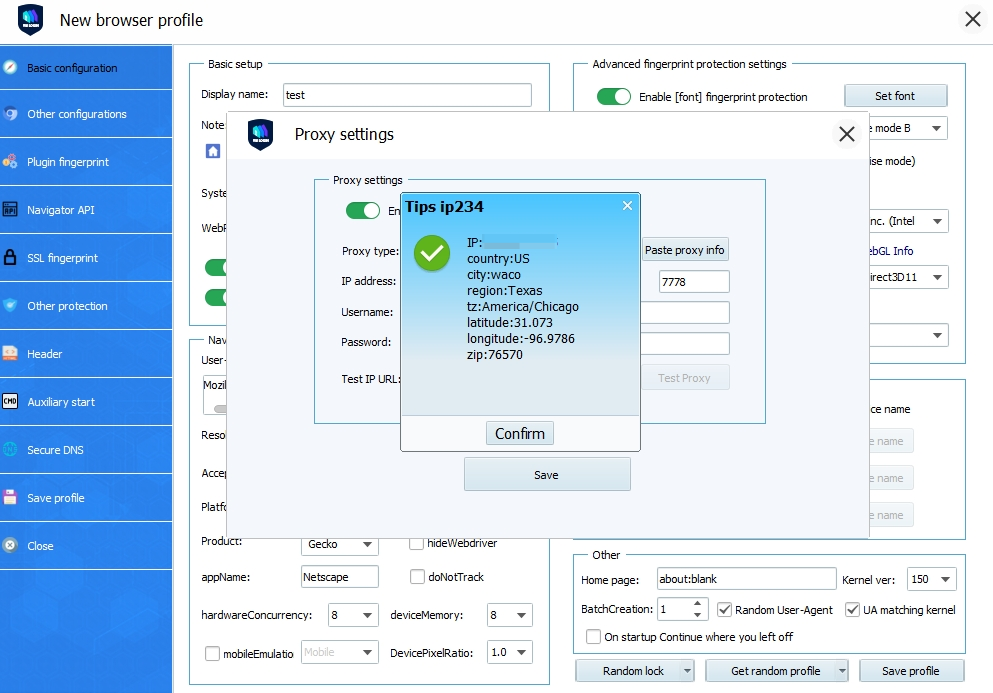
After confirming that the proxy can connect successfully, click Confirm to close the test result, then click Save in the proxy settings window.
Return to the browser profile configuration page, complete any other settings as needed, then click Save profile.
After saving, locate the corresponding profile under Browser profile and launch it to use the configured IPWeb proxy.
If you encounter an issue not covered above, feel free to contact us for technical support:
- Telegram: t.me/ipwebadmin
- Phone: 13064703052
- QQ: Scan the QR code to add us
- WeChat: Scan the QR code to add us
- Help Center: https://docs.ipweb.cc/