IPWeb Static Native Proxy User Guide
This guide explains how to purchase and view IPWeb Static Native Proxies. Two access types are available: Dedicated and Shared. Both support Custom purchase and non-custom purchase options.
1. How to Purchase a Proxy
After logging in to the IPWeb user dashboard, go to:
Proxy Products > Static Native Proxy > Buy Proxy
On the purchase page, select Dedicated or Shared based on your needs, then choose whether to enable Custom purchase.
Purchase a Dedicated Proxy
A Dedicated proxy is assigned exclusively to the current account. When purchasing, you can turn Custom purchase on or off.
Custom Purchase
On the Buy Proxy page, select Dedicated and enable Custom purchase.
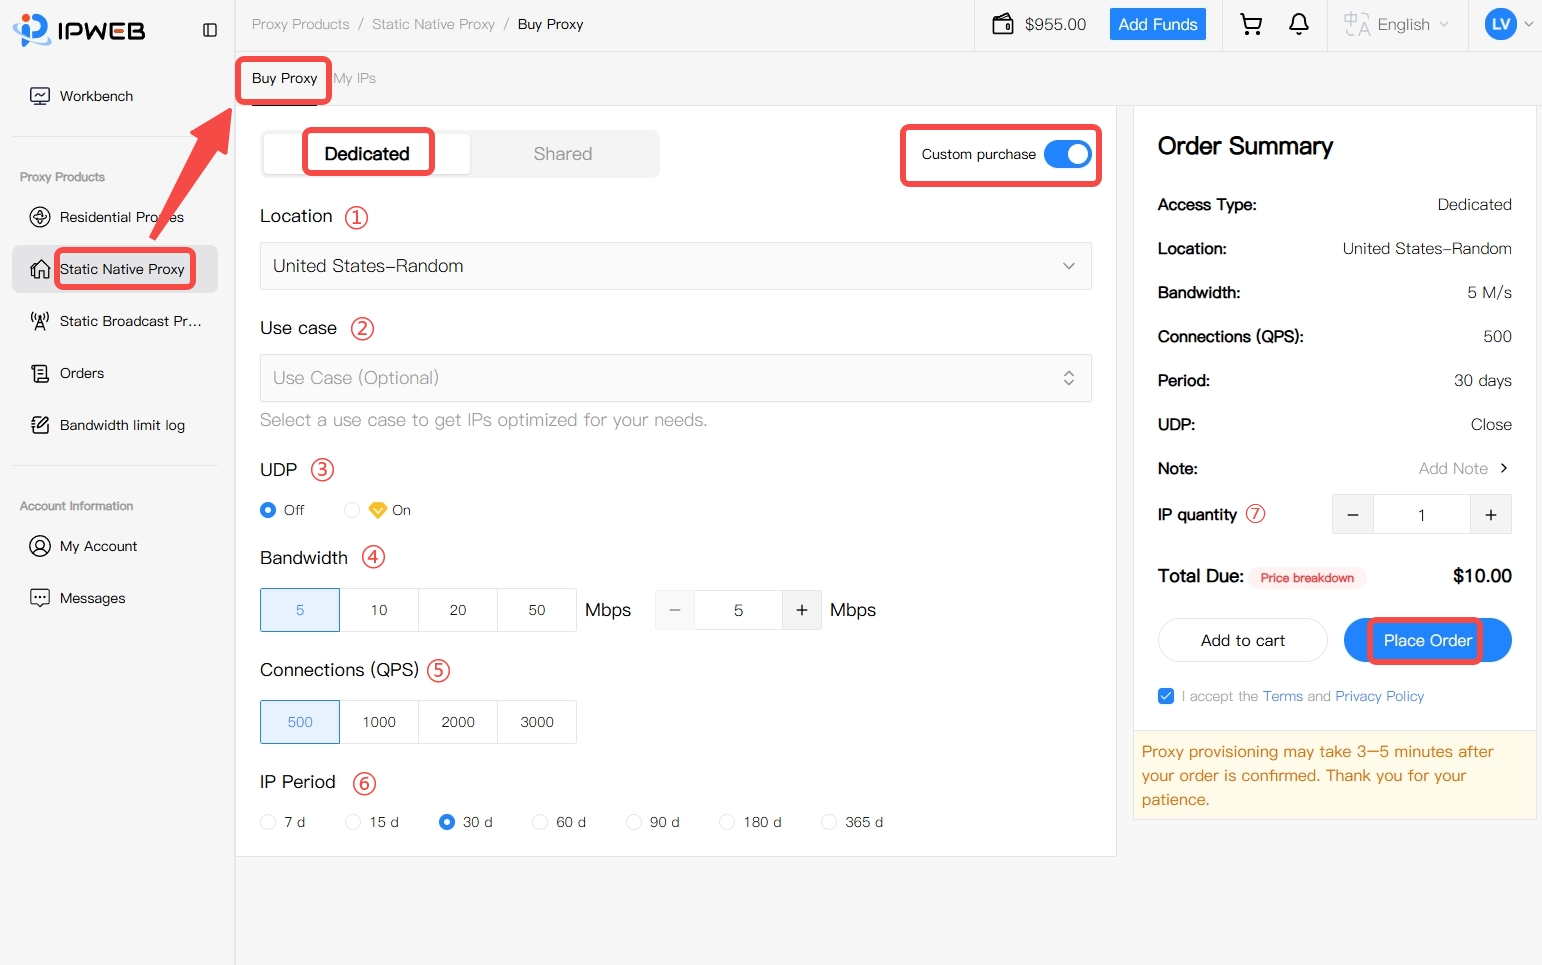
Once enabled, you can configure the following options based on your requirements.
Step 1: Select a Location
Click Location and choose the proxy exit location you need.
The page lets you select a country by region and then narrow the selection down to a city. For example, after selecting the United States, you can choose Random or a specific city.
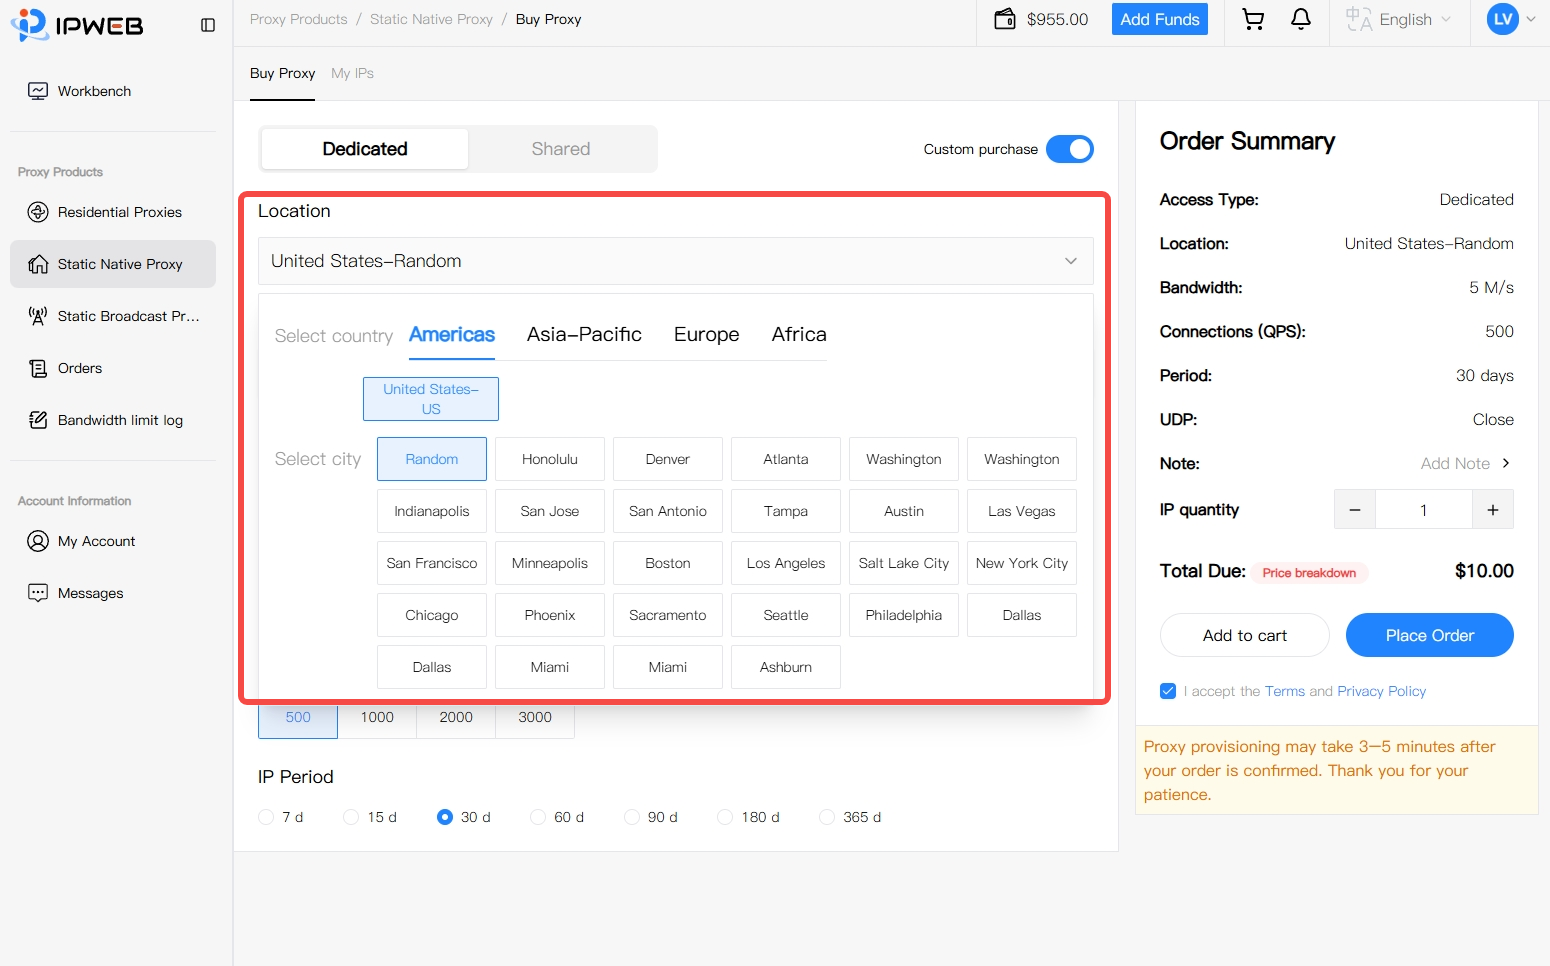
Note: Available countries, regions, and cities depend on the resources currently shown in the dashboard. If you select Random, the system will assign a proxy IP from the available resources in the selected country or region.
Step 2: Select a Use Case (Optional)
If you have specific requirements for how the proxy will be used, select the appropriate option under Use case.
The dashboard displays available use-case tags that can be used to match IP resources filtered for the corresponding use case.
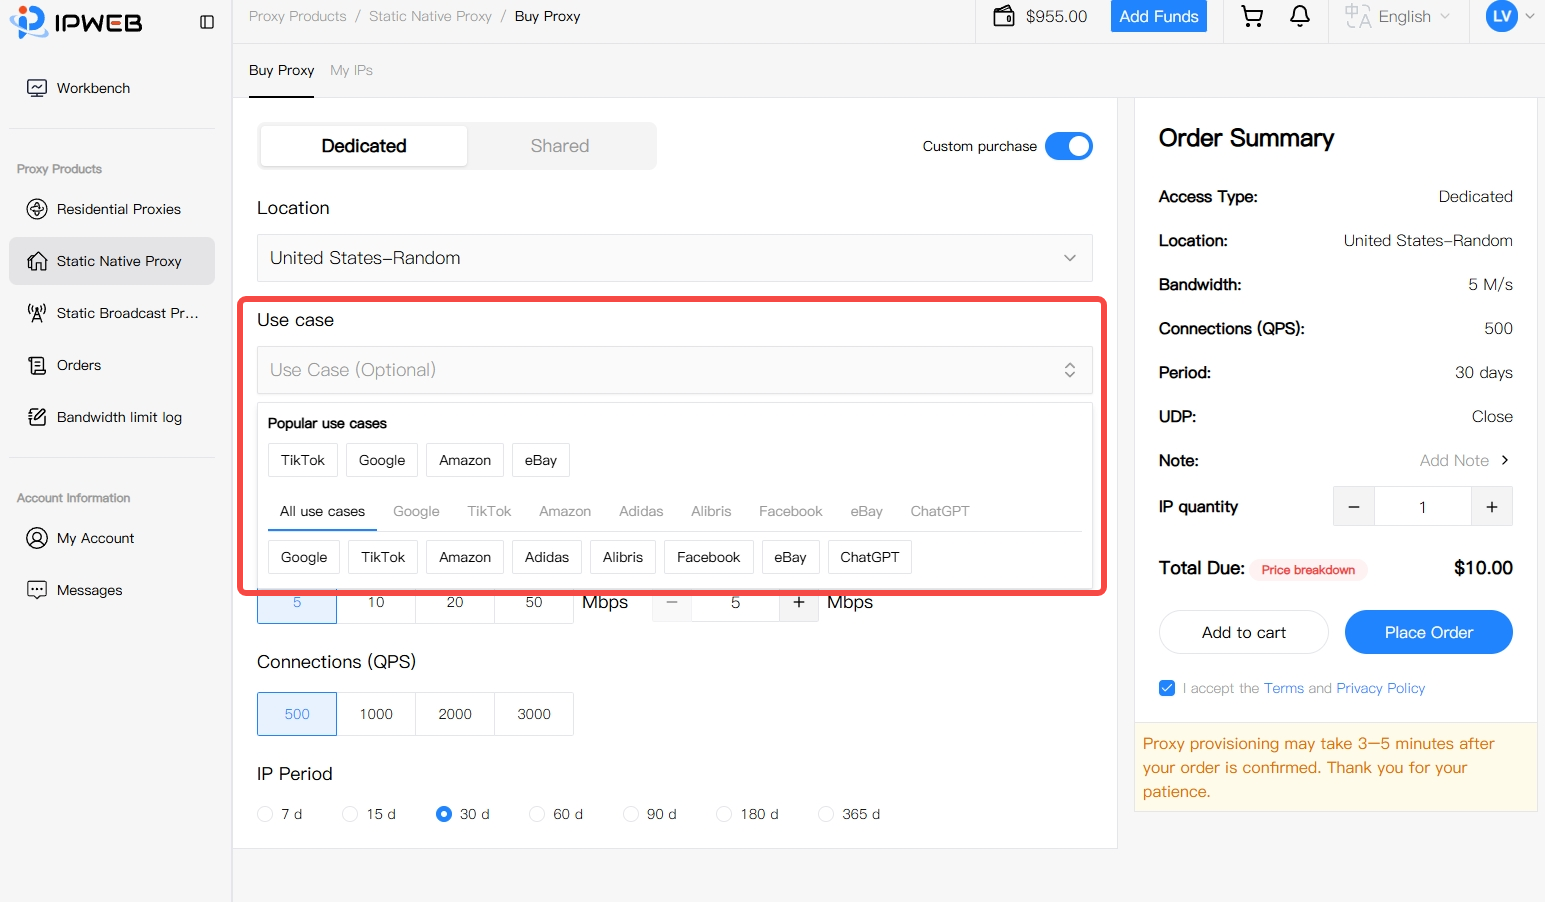
If you do not have a specific use-case requirement, you can leave this option unselected.
Step 3: Configure UDP
Choose whether to enable UDP based on your actual usage requirements:
-
Off: UDP is disabled.
-
On: UDP support is enabled.
Whether UDP is required depends on the software, protocol, and use case you are working with.
Step 4: Select Bandwidth
Choose the bandwidth for the current proxy instance.
The available bandwidth options shown on the page include:
-
5 Mbps
-
10 Mbps
-
20 Mbps
-
50 Mbps
You can also use the control on the right to adjust the bandwidth value. The actual selectable range is subject to what is currently available in the dashboard.
Note: Bandwidth represents the network throughput available to the current proxy connection. Before purchasing, choose a suitable bandwidth based on your expected concurrency and data transfer requirements.
Step 5: Select Connections (QPS)
Select Connections (QPS) based on your concurrent request requirements.
The available options shown on the page include:
-
500
-
1000
-
2000
-
3000
Note: QPS (Queries Per Second) indicates the number of requests that can be handled per second. Choose the appropriate tier based on your request rate and concurrency requirements.
Step 6: Select the IP Period
Choose the service period for the proxy IP.
The current page provides the following options:
-
7 days
-
15 days
-
30 days
-
60 days
-
90 days
-
180 days
-
365 days
Step 7: Set the IP Quantity
In the Order Summary panel on the right, set the number of IPs you want to purchase.
The system automatically calculates the total amount due based on your current selections, including:
-
Access Type
-
Location
-
Bandwidth
-
QPS
-
IP Period
-
UDP status
-
IP quantity
After confirming that all order details are correct and accepting the Terms and Privacy Policy, click Place Order.
If you do not want to check out immediately, you can also select Add to cart.
Non-Custom Purchase
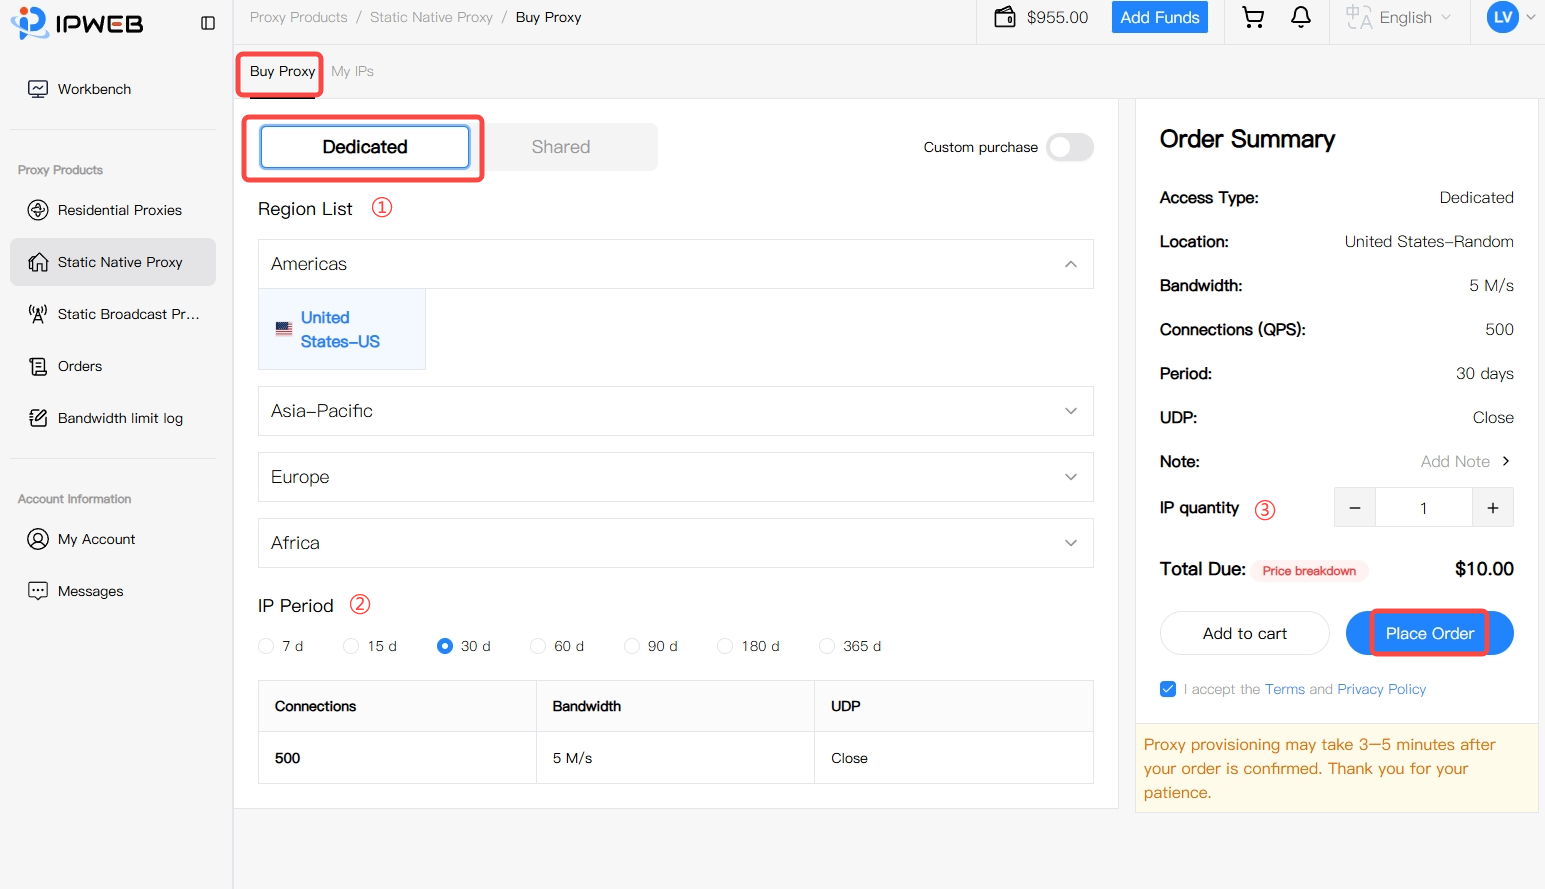
If you do not need to configure Bandwidth, QPS, UDP, and other settings individually, turn off Custom purchase in the upper-right corner.
The page will switch to the preset configuration purchase mode.
Step 1: Select a Region
Under Region List, select the country or region you need.
Available locations are grouped by continent, for example:
-
Americas
-
Asia-Pacific
-
Europe
-
Africa
Expand the corresponding region and select the country you need.
Step 2: Select the IP Period
Choose the proxy service period, such as:
-
7 days
-
15 days
-
30 days
-
60 days
-
90 days
-
180 days
-
365 days
Step 3: Confirm the Preset Configuration
In non-custom purchase mode, Bandwidth, Connections (QPS), UDP, and other parameters are preset by the selected plan.
The page displays the corresponding configuration directly, including:
-
Connections
-
Bandwidth
-
UDP status
Before purchasing, confirm that the displayed plan configuration meets your requirements.
Step 4: Set the IP Quantity and Place the Order
In the Order Summary panel on the right, set the number of IPs you want to purchase. After confirming the Location, IP Period, plan configuration, and total amount due, click Place Order.
Purchase a Shared Proxy
Shared proxies use a shared resource pool. The purchase process is generally the same as for Dedicated proxies, and you can also choose between Custom purchase and non-custom purchase.
Custom Purchase
On the Buy Proxy page, select Shared and enable Custom purchase.
Configure the following options in order:
-
Location
-
Use case (Optional)
-
UDP
-
Bandwidth
-
Connections (QPS)
-
IP Period
-
IP quantity
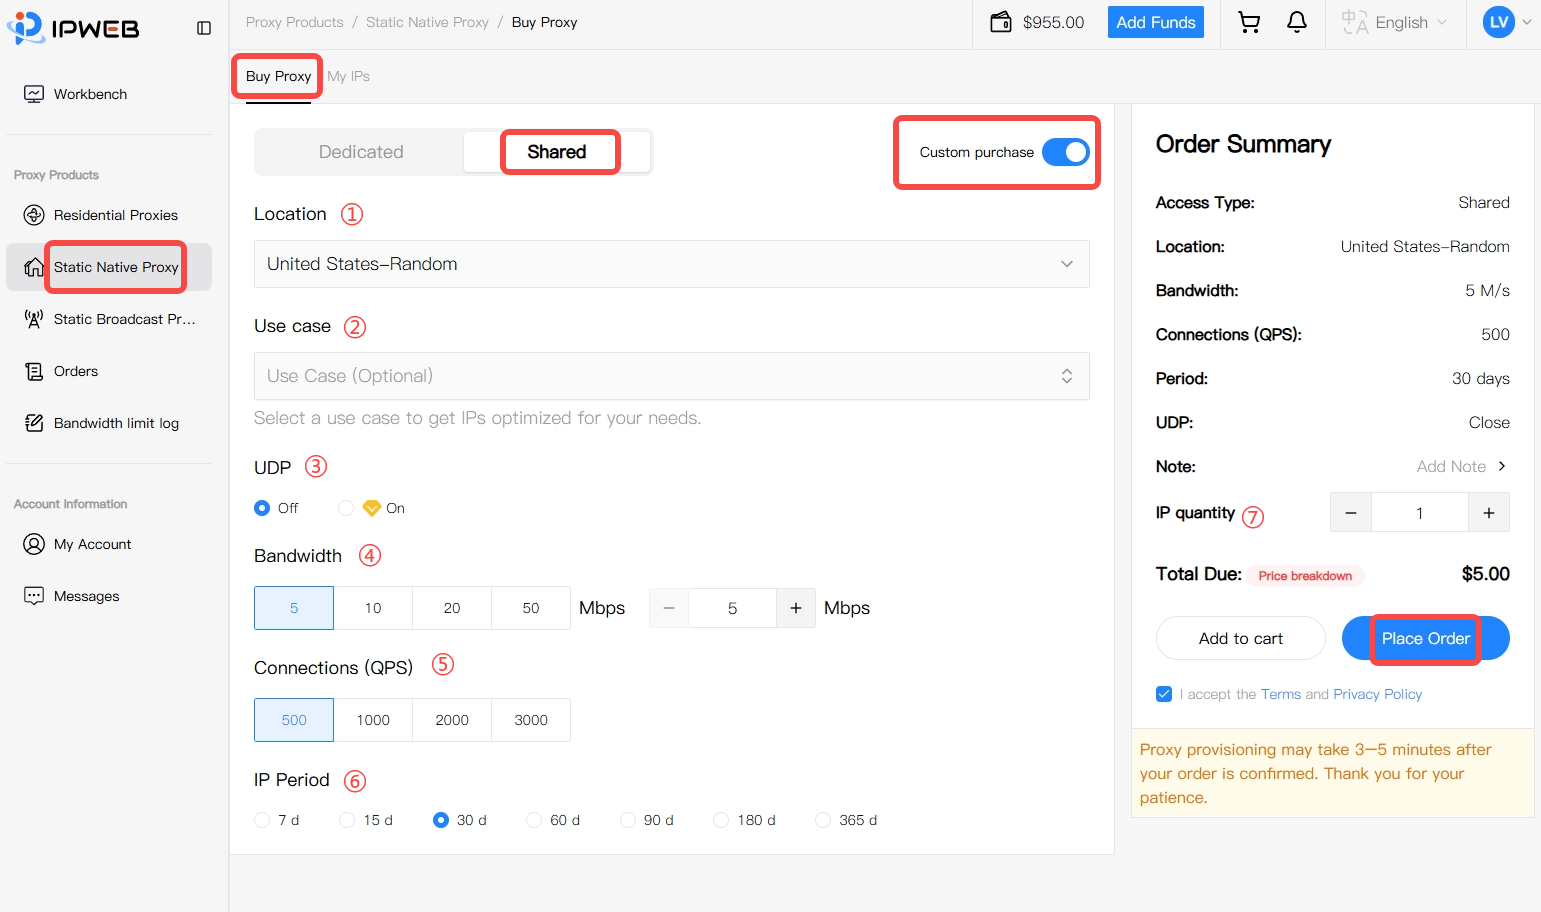
After configuring the options, review the following details in Order Summary on the right:
-
Access Type: Shared
-
Location
-
Bandwidth
-
Connections (QPS)
-
IP Period
-
UDP status
-
IP quantity
-
Total Due
After confirming that all details are correct, click Place Order.
Non-Custom Purchase
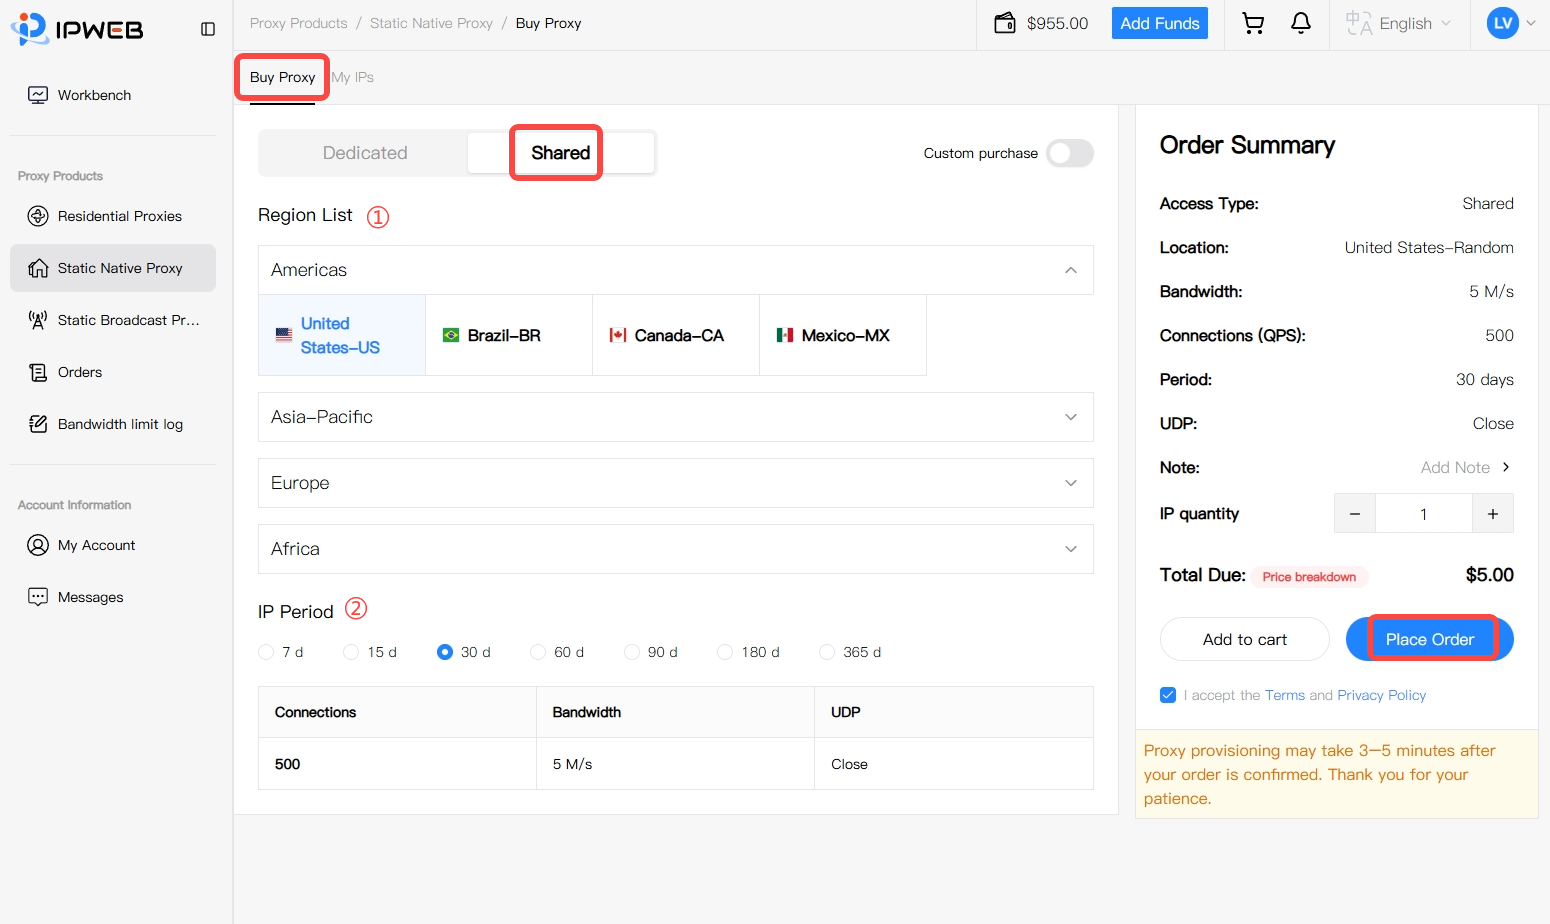
After selecting Shared, turn off Custom purchase to use the preset configuration purchase mode.
Follow these steps:
-
Select a country or region under Region List.
-
Select the IP Period.
-
Review the preset Connections, Bandwidth, and UDP status shown on the page.
-
Set the IP quantity in the panel on the right.
-
Confirm the order details and total amount due.
-
Click Place Order.
Pay for the Order
After you click Place Order, the system creates a pending order and opens the payment page.
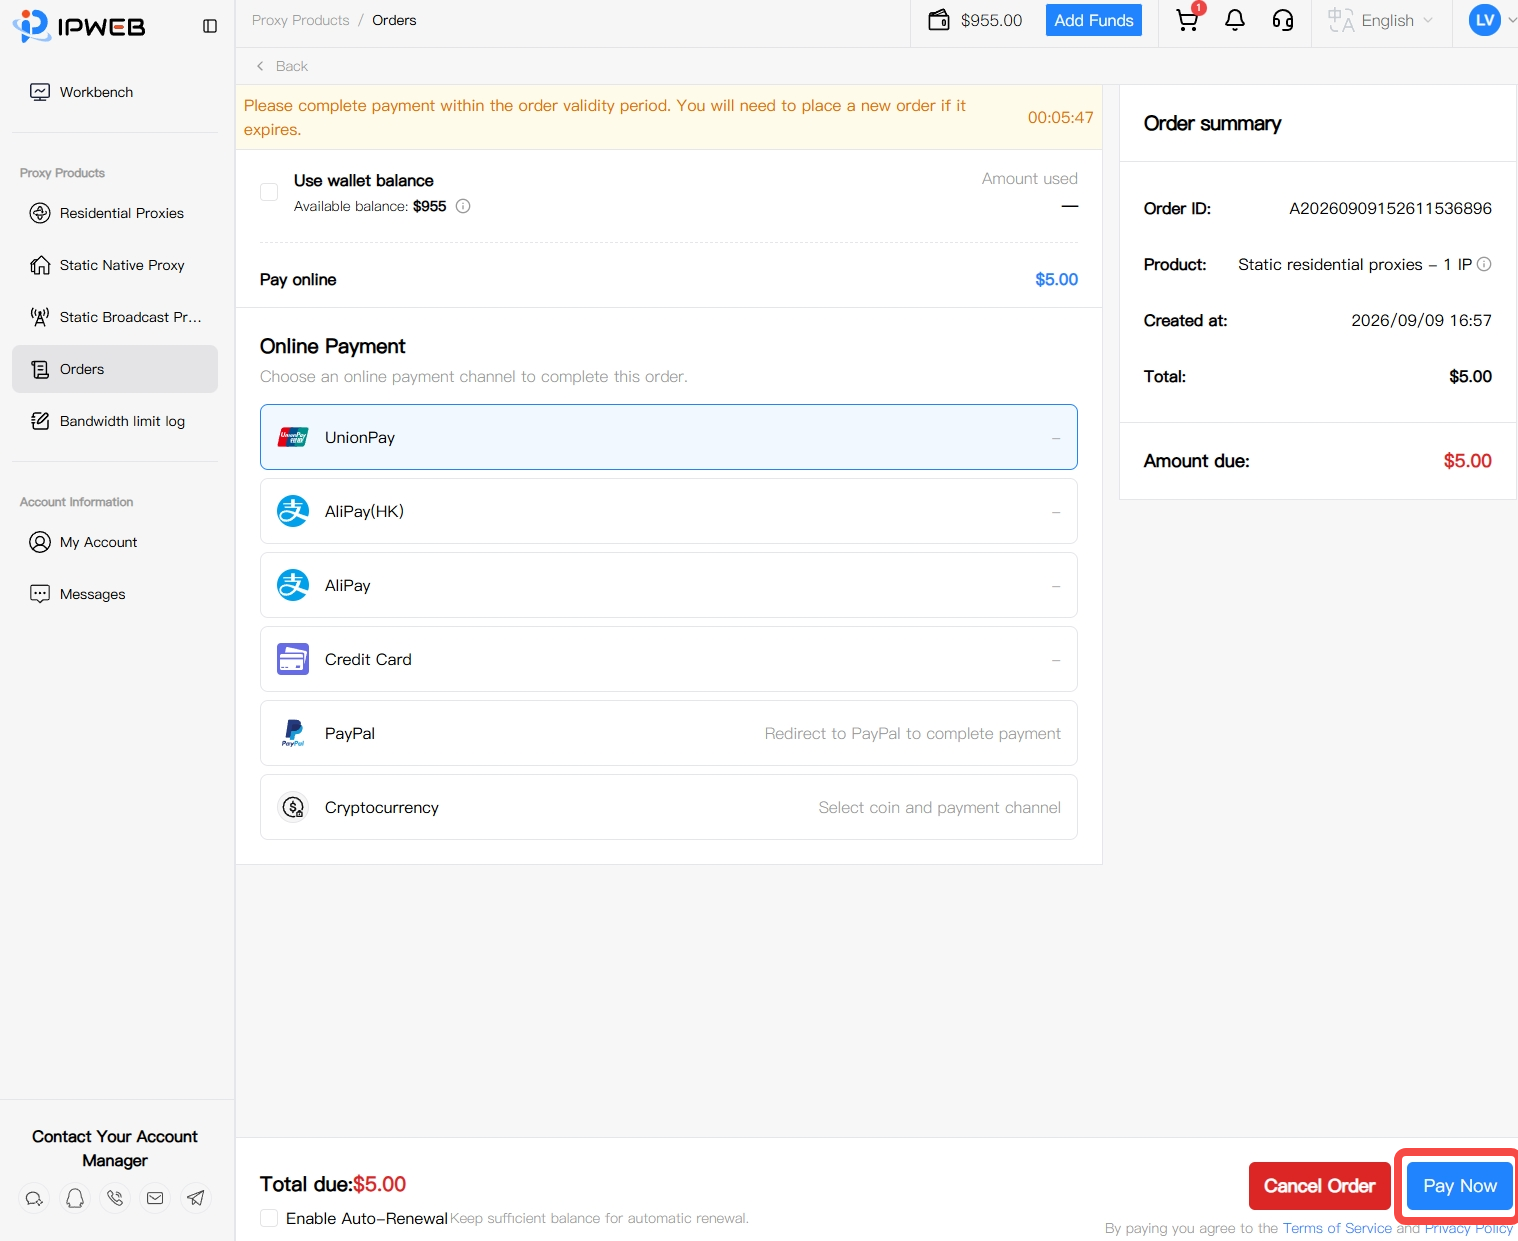
The page displays the Order ID, Product, Created at time, and Amount due.
The payment methods currently shown on the page include:
-
wallet balance
-
UnionPay
-
AliPay (HK)
-
AliPay
-
Credit Card
-
PayPal
-
Cryptocurrency
After selecting a payment method, click Pay Now and follow the on-screen instructions to complete payment.
If you do not want to continue with the purchase, click Cancel Order.
Order Notes:
After a pending order is created, the inventory is temporarily reserved for 15 minutes. It is recommended that you complete payment within the reservation period.
The page supports Enable Auto-Renewal using your account balance. If you enable auto-renewal, make sure your account has sufficient balance.
After the order is confirmed, proxy provisioning may take approximately 3–5 minutes. Please wait for the system to finish configuring the resources.
2. How to View Purchased Proxies
After your Static Native Proxy has been purchased and activated, go to:
Proxy Products > Static Native Proxy > My IPs
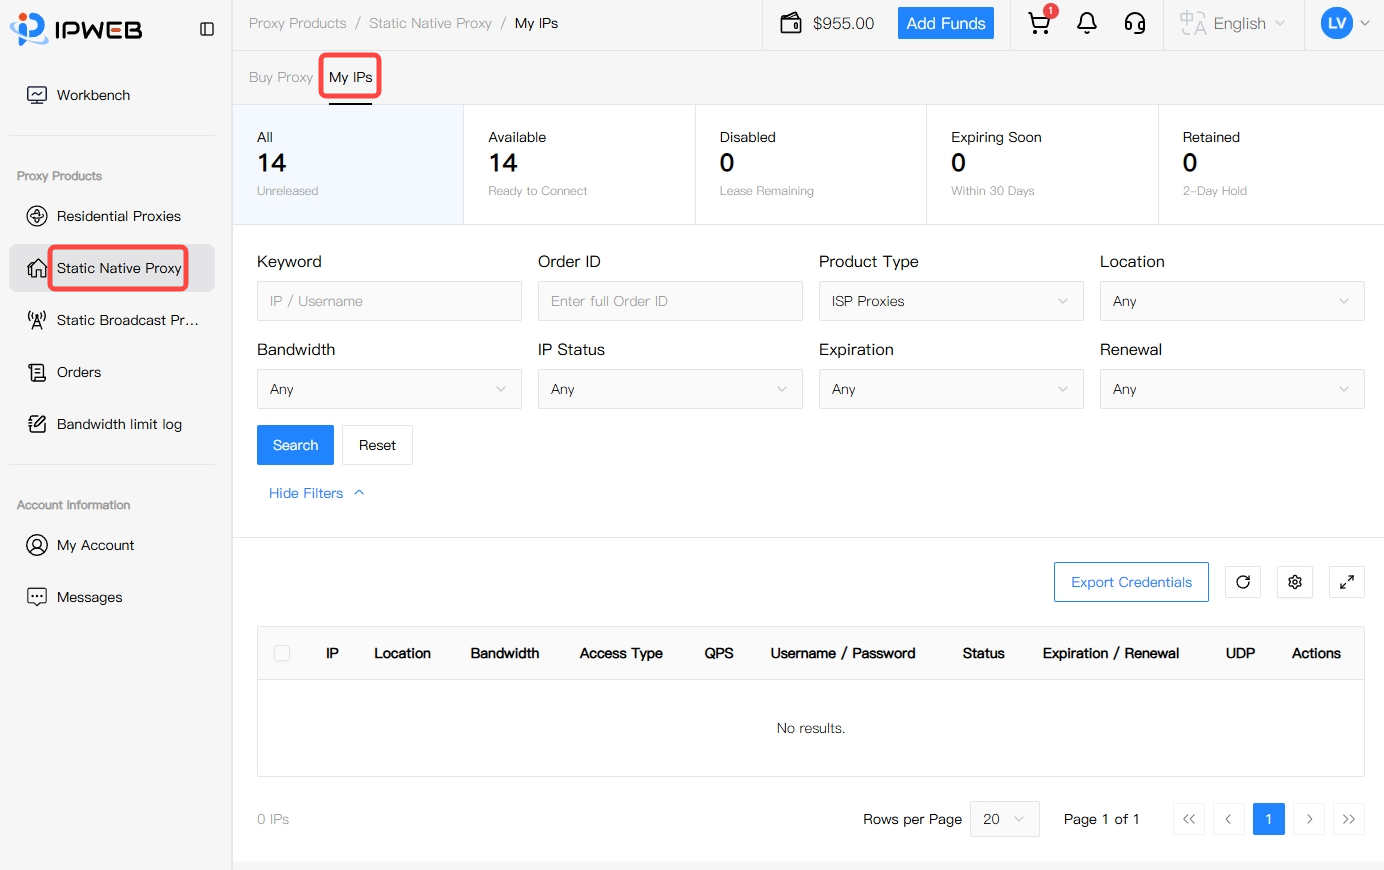
Here you can view the Static Native Proxy resources purchased under the current account.
View Proxy Status
At the top of the page, the dashboard summarizes the current status of proxy IPs under your account, including:
-
All
-
Available
-
Disabled
-
Expiring Soon
-
Retained
For Expiring Soon and Retained, the exact time ranges are subject to the rules currently displayed in the dashboard.
Filter the Proxies You Want to View
The page supports multiple filters for finding proxy resources, including:
-
Keyword: Search by IP or username.
-
Order ID: Enter the full Order ID.
-
Product Type
-
Location
-
Bandwidth
-
IP Status
-
Expiration
-
Renewal
After setting the filters, click Search.
To clear the current filters, click Reset.
View Proxy Details
The proxy list displays the main information for your current Static Native Proxies, including:
-
IP
-
Location
-
Bandwidth
-
Access Type
-
QPS
-
Username / Password
-
Status
-
Expiration / Renewal
-
UDP
-
Actions
Before using a proxy, it is recommended that you verify the IP, username and password, Bandwidth, QPS, expiration date, and Status.
Export Proxy Credentials
If you need to save proxy connection details in bulk, click Export Credentials in the upper-right area of the page.
Before exporting, it is recommended that you confirm the proxy resources and active filters under the current account to avoid mixing proxies from different locations, plans, or service periods.
Security Note: Proxy usernames and passwords are authentication credentials. Store them securely and do not share them publicly or with unauthorized parties.