IPWeb Dynamic Proxy User Guide
1. How to get dynamic residential proxies?
This chapter covers the basic purchase and usage flow for IPWeb dynamic proxies, including traffic top-up, getting proxies, and viewing traffic history and top-up records.
1.1 Traffic top-up
After logging in to the IPWeb dashboard, go to Proxy Products > Dynamic Proxy in the left navigation. The default page is Traffic Top-up.
Step 1: Choose and purchase traffic
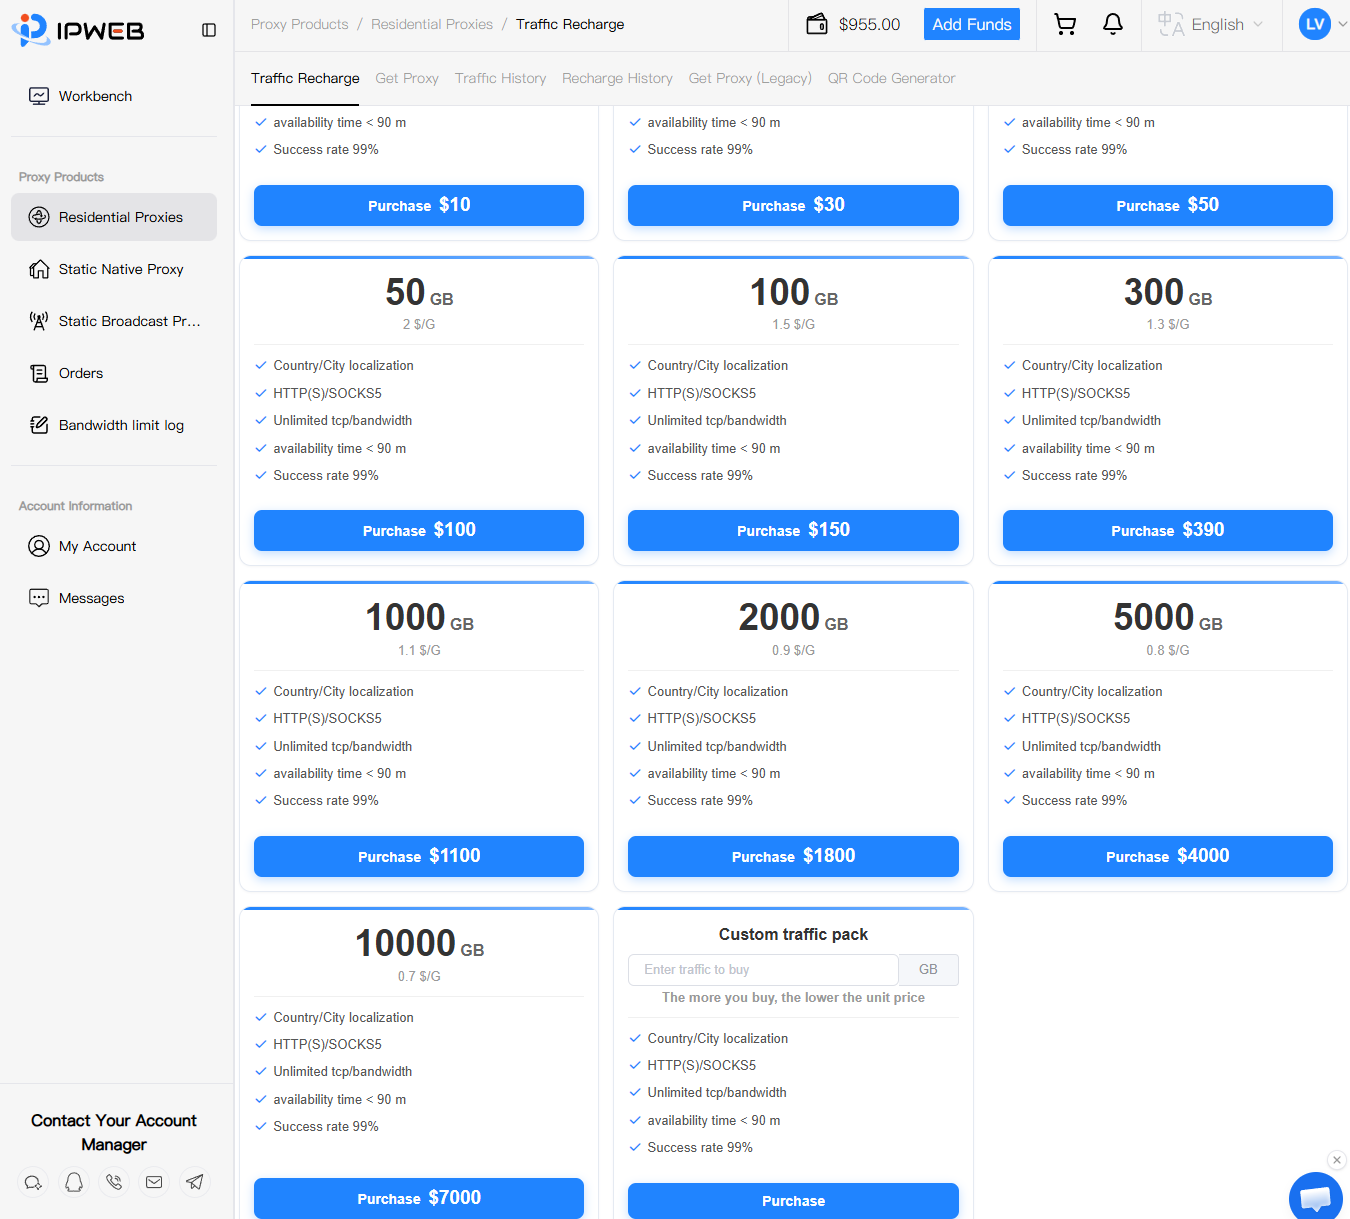
On the Traffic Top-up page, review the billing rules for current traffic packages.
-
Traffic is billed per GB;
-
Larger volume means a lower unit price;
-
Custom traffic packages are supported.
Click to purchase the package that fits your needs.
Step 2: Confirm the order and complete payment
On the Order Confirmation page, review the purchase details again, including:
-
Unit price
-
Traffic volume
-
Amount
After confirming the order is correct, choose an available payment method.
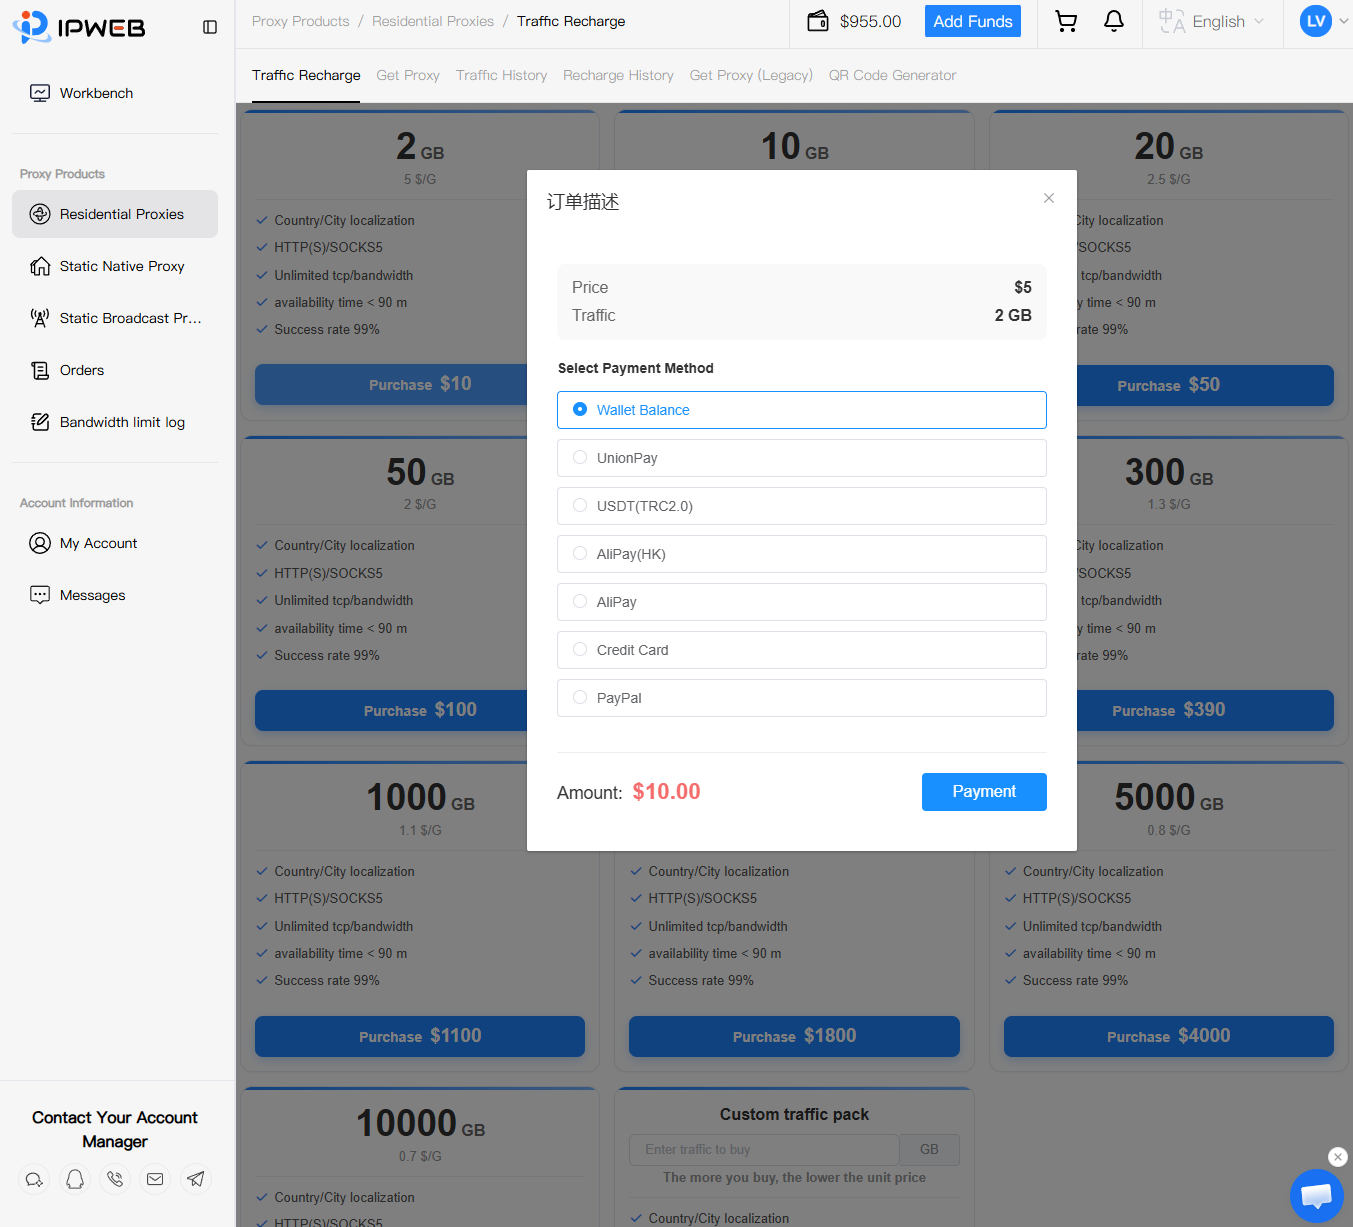
Supported payment methods on the page include:
-
Wallet balance
-
UnionPay
-
USDT (TRC2.0)
-
Alipay (Hong Kong)
-
Alipay
-
Credit card
-
PayPal
After selecting a payment method, click Pay and follow the on-screen instructions.
When payment succeeds, the corresponding traffic is credited to your dynamic proxy account under the order rules and can be used to generate and use proxies.
Note: Available payment methods may vary by account, region, or backend configuration. Please follow what is shown on the payment page.
1.2 Get Proxy
After topping up traffic, go to Proxy Products > Dynamic Proxy > Get Proxy to generate proxy connection details based on your needs.
Step 1: Set the proxy location
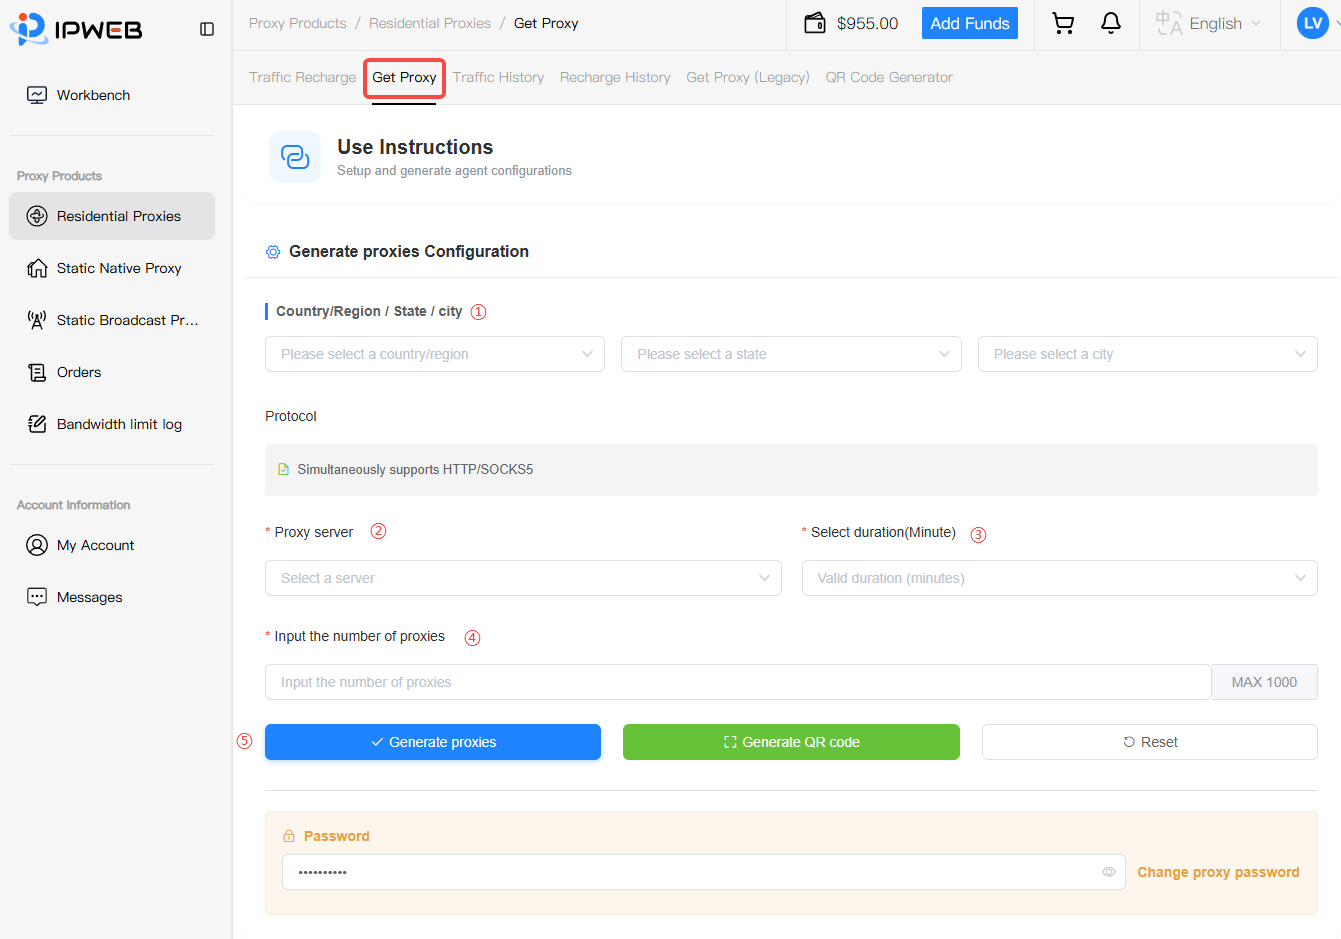
In the Generate Proxy Configuration area, choose the exit location.
The page supports location filters at these levels:
-
Country/Region
-
State
-
City
If you do not need state or city precision, choose the targeting level that matches your business needs.
Location options determine the geographic target of the exit IP. Available countries, states, and cities depend on current backend resources.
Step 2: Confirm the proxy protocol
The page shows that proxies support:
-
HTTP
-
HTTPS
-
SOCKS5
You do not need to switch protocols when generating proxies. Configure the protocol supported by your client, browser, or application when connecting.
Step 3: Choose the proxy server and IP session duration
Continue with these parameters:
-
Proxy server: Choose the gateway node used to access the dynamic proxy network.
-
IP session duration: Set how long the exit IP stays valid in the current proxy session. Units follow the dashboard page.
IP session duration controls how long a dynamic exit IP is kept under the current configuration. After the duration ends, the exit IP may rotate according to service rules.
IP session duration is not the same as a static proxy. Dynamic proxies remain dynamic IP resources. Exact keep-and-rotate behavior follows backend service rules.
Step 4: Set the proxy count
Enter how many proxy lines to generate in Proxy Count.
The page shows a maximum of 1,000 lines per generation.
Set the quantity based on actual usage and avoid generating a large number of unused configurations at once.
Step 5: Generate proxies
After setting location, proxy server, IP session duration, and proxy count, click:
-
Generate Proxy: Generate proxy details for clients or applications;
-
Generate QR Code: Generate the configuration as a QR code for scanners that support import.
To reset parameters, click Reset.
The page also provides proxy password management. To change the current authentication password, click Change Proxy Password.
Security tip: Proxy usernames and passwords are credentials. Keep them secure and do not share them publicly. After changing the proxy password, update saved credentials in browsers, proxy software, or applications as well.
1.3 View traffic history and top-up records
The IPWeb dashboard provides Traffic History and Top-up History to review dynamic proxy traffic usage and account traffic changes.
View traffic history
Go to Proxy Products > Dynamic Proxy > Traffic History.
In the query area, filter records by:
-
Start/End time
-
Username
-
Proxy account
After setting filters, click Search. To clear filters, click Reset.
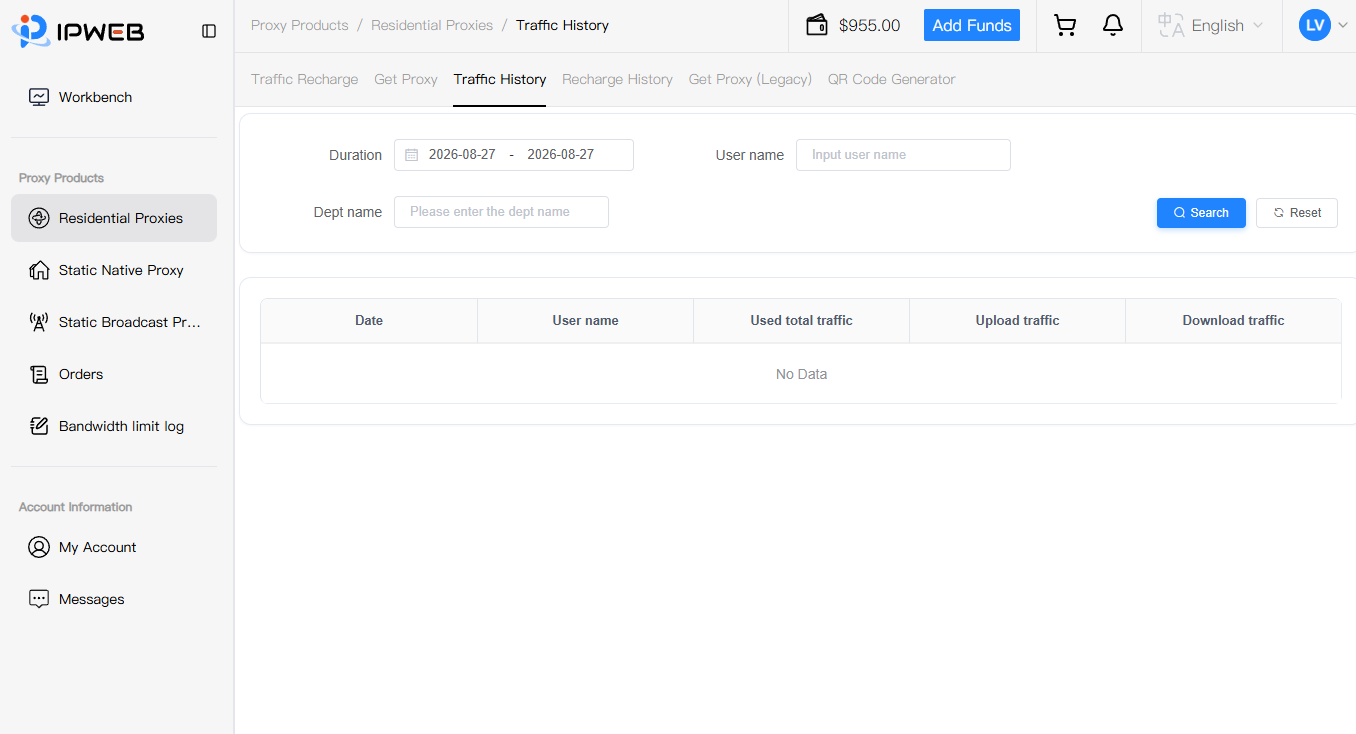
The traffic history list mainly shows:
-
Date
-
Username
-
Total traffic used
-
Upload traffic
-
Download traffic
Where:
-
Upload traffic: Data sent from the client to the proxy network;
-
Download traffic: Data returned from the proxy network to the client;
-
Total traffic used: Overall traffic usage for the record.
Use traffic history to reconcile dynamic proxy consumption by date, user, or proxy account.
View top-up records
Go to Proxy Products > Dynamic Proxy > Top-up History.
The page supports filtering top-up or traffic-change records by:
-
Username
-
Type
-
Top-up source username
-
Record ID
-
Order number
Enter filters, then click Search. To query again, click Reset.
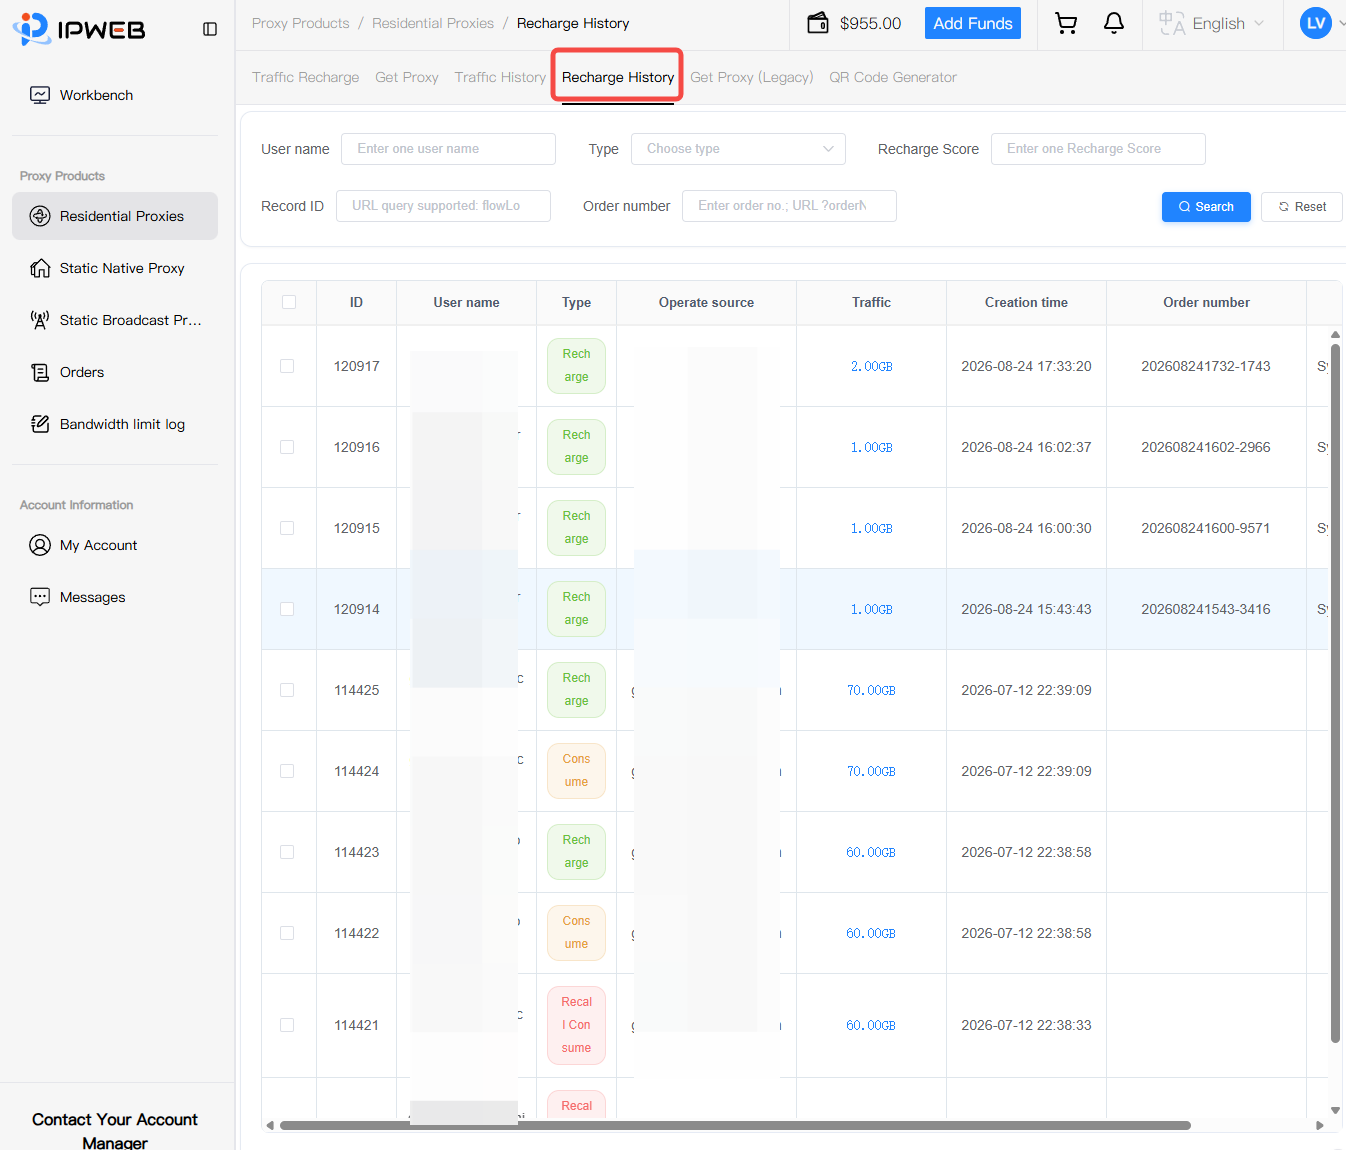
The top-up history list shows record details such as:
-
ID
-
Username
-
Type
-
Operation source
-
Traffic amount
-
Created at
-
Order number
Use this page to verify traffic top-ups and related system changes, and look up specific top-ups by order number.
Tip: If remaining traffic does not match expectations, first check actual usage in Traffic History, then confirm recent top-ups or changes in Top-up History.
2. What do the exported proxy fields mean?
After completing the steps above, open the downloaded .txt file. It contains proxy connection details.
IPWEB follows SOCKS5/HTTP proxy conventions. Username/password format:
proxy_host(IP_or_domain):port:username:password
Some providers also use:
username:password:proxy_host(IP_or_domain):port
Example
Sample line:
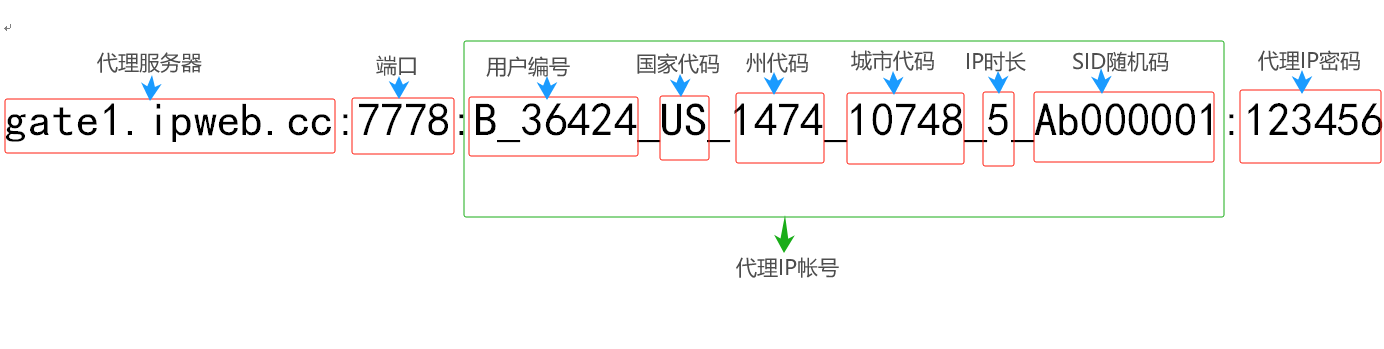
gate1.ipweb.cc:7778:B_36307_US_1474_10748_5_Ab000001:123456
Field breakdown:
- Proxy server:
gate1.ipweb.cc - Port:
7778 - User ID:
B_36307 - Country code:
US - State code:
1474 - City code:
10748 - Session duration (minutes):
5 - SID:
Ab000001 - Proxy password:
123456 - Protocols: SOCKS5 and HTTP(S) on the same port—no port change needed
Diagram
Verify the proxy
Test the exported line with curl:
curl -x B_36424_US_1474_10748_5_Ab000001:123456@gate1.ipweb.cc:7778 ipinfo.io
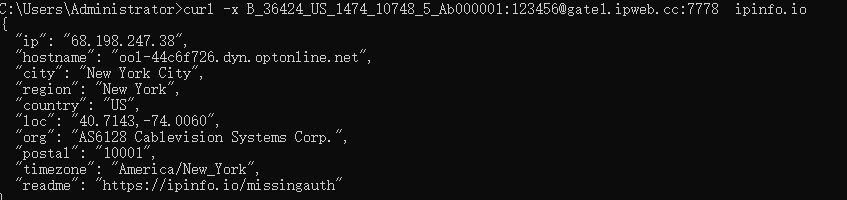
A successful response shows a US IP (country US), New York state (code 1474), New York City (code 10748).
3. How to build proxies with custom account rules?
Custom proxy accounts follow IPWEB formatting rules—manually or programmatically—to produce the proxy lines you need.
1. Change country, state, and city codes
From the sample above, change country/state/city codes to target other locations. State and city are optional:
gate1.ipweb.cc:7778:B_36424_US___5_Ab000001:123456
Empty state and city means any location within the US.
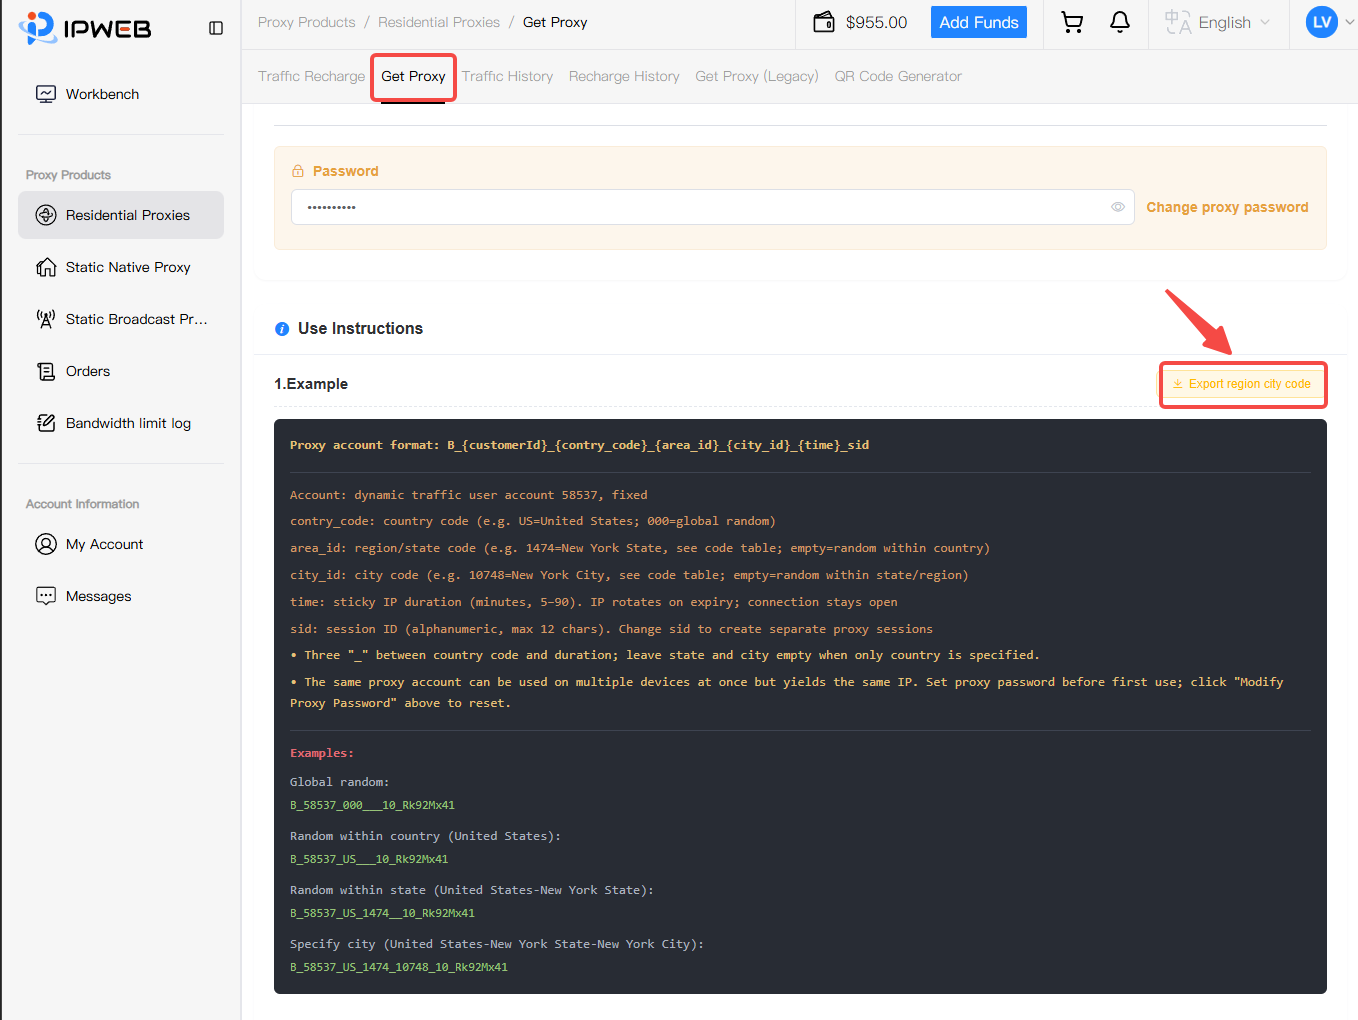
Where to find country, state, and city codes?
Log in to the IPWEB dashboard at https://ipweb.cc/iproxy/login, then under Get Proxy click Export Region/City Codes to download codes for 200+ countries and nearly 20,000 cities.
2. Change country and session duration
Starting from:
gate1.ipweb.cc:7778:B_36424_US___5_Ab000001:123456
For Hong Kong, replace US with HK:
gate1.ipweb.cc:7778:B_36424_HK___5_Ab000001:123456
For a 10-minute session instead of 5, change 5 to 10:
gate1.ipweb.cc:7778:B_36424_HK___10_Ab000001:123456
3. Generate many proxies by changing SID
Example base line:
gate1.ipweb.cc:7778:B_36424_US_1474_10748_5_Ab000001:123456
Change the SID to obtain different exit IPs. With custom account rules, you can generate unlimited proxy lines, for example:
gate1.ipweb.cc:7778:B_36424_US_1474_10748_5_Ab000001:123456
gate1.ipweb.cc:7778:B_36424_US_1474_10748_5_Ab000002:123456
gate1.ipweb.cc:7778:B_36424_US_1474_10748_5_Ab000003:123456
...
gate1.ipweb.cc:7778:B_36424_US_1474_10748_5_X9999999:123456
Note: SID can be any 8 alphanumeric characters (letters and digits). Special characters (e.g.
@!%*) are not allowed.
Changing SID lets you scale proxies or rotate IPs on demand.
4. Worldwide random proxies
If you do not want to limit proxies to one country and prefer a random country worldwide, set the country code to 000:
gate1.ipweb.cc:7778:B_36424_000___10_Ab000001:123456
4. How to choose a proxy server?
IPWEB operates gateways in three regions:
- Americas (North & South):
gate1.ipweb.cc:7778 - Asia-Pacific (incl. Oceania):
gate2.ipweb.cc:7778 - Europe & Africa:
gate3.ipweb.cc:7778
Pick a gateway based on your workload and where your application runs. The auto-assigned gateway usually offers the lowest latency. Contact IPWEB support if you need help choosing.